Building Your Own FPV Drone: The Ultimate Guide
- James Baptiste

- Aug 2, 2025
- 19 min read
Updated: Aug 4, 2025
If you're thinking about getting into FPV drones, you're at a fork in the road. Do you buy a pre-built quad and get in the air today, or do you take the plunge and build your own from scratch? It's a big decision, but choosing to build is one of the most rewarding projects you can tackle in this hobby. It's an incredible mix of technical skill and the pure thrill of flight, and the end result is a machine built perfectly for you.
Why Bother Building Your Own FPV Drone?
Going the DIY route over grabbing an off-the-shelf drone is a major first step, I get it. The instant gratification of a pre-built model is tempting, but building gives you a much deeper, more authentic connection to FPV. You stop being just a pilot and become the creator, the engineer, and the mechanic of your own little rocket ship.
This hands-on approach completely demystifies what makes these incredible machines tick. It's a game-changer.
The Ultimate Crash Course in Drone Tech
Honestly, the biggest reason to build your own FPV drone is the knowledge you'll soak up along the way. When you assemble a drone piece by piece, you're forced to understand what every single component does. You'll see exactly how the flight controller acts as the brain, how the motors and ESCs work in concert to generate thrust, and how the FPV system beams that live video feed straight to your goggles.
This knowledge is pure gold. When you inevitably crash—and trust me, every FPV pilot crashes—you'll have the confidence and skill to figure out what went wrong and fix it yourself. Instead of boxing up a broken drone for a costly and time-consuming repair, you can just swap out a snapped arm or a burnt-out motor and be back in the air in no time.
The feeling of successfully flying a machine you built with your own two hands is something you just can't buy. It fundamentally changes your relationship with the hobby; you're not just a consumer anymore, you're a creator.
Unlocking Total Customization and Peak Performance
Building your own FPV drone opens the door to limitless customization. You’re completely free from a manufacturer's cookie-cutter design. This means you can hand-pick every single part to match exactly what you want to do.
Freestyle Flying: You can build a tank with a durable frame, powerful motors, and a rock-solid video transmitter to take a beating during acrobatic flights.
Long-Range Exploration: You might opt for super-efficient motors, a larger frame to haul big batteries, and a GPS module for fail-safe return flights over mountains or coastlines.
Drone Racing: Priority one is a feather-light frame and high-KV motors for blistering speed and razor-sharp agility on the race track.
This level of personalization guarantees your drone performs precisely how you envision it. It's a journey from a pile of parts to a flying machine that's a true extension of your personal style. This DIY enthusiasm is a huge driver in the FPV world, with projections showing the market growing to an estimated $2,553.92 million by 2032. If you're curious, you can check out the full FPV drone market forecast to see just how much the industry is booming, thanks in large part to builders and racers like us.
Picking the Right Parts for Your FPV Drone
Alright, this is where the real fun begins. Diving into a custom FPV drone build starts with the most exciting part: picking your components. This isn't just about making a shopping list; you're literally selecting the DNA for your future flying machine. Every single part you choose directly impacts how your drone will handle, how much abuse it can take, and ultimately, the kind of pilot you'll become.
The great news is that getting into the DIY side of FPV has never been easier. The community is thriving, fueled by falling costs and incredible modularity. As of 2025, the average prices for core components like flight controllers and motors have plummeted by nearly 40% compared to a decade ago. This affordability, combined with powerful open-source software, means you can build a quad that's perfectly tuned to your goals. You can see more data on these FPV market trends at archivemarketresearch.com.
Let's walk through the essential bits and pieces that will go from a pile of electronics on your workbench to your very own custom FPV drone.
The Frame: Your Drone's Skeleton
First up is the frame, which is the literal backbone of your build. It dictates the drone's size, its overall weight, and just how well it will survive the inevitable "unplanned landings." Frames are usually sized by the largest propeller they can spin, and 5-inch frames are overwhelmingly the most popular choice for their perfect blend of agility and power.
Your flying style should be the main driver of your decision here:
Freestyle Frames: Think of these as the tanks of the FPV world. They are generally heavier, built with thick carbon fiber arms (often 5-6mm), and have plenty of room to protect your electronics during a gnarly crash.
Racing Frames: These are all about being lightweight and aerodynamic. You'll often see them in a "true-X" or "squashed-X" layout, which gives them incredibly symmetrical handling and helps minimize prop wash during tight turns.
Motors and ESCs: The Power Plant
The motors and Electronic Speed Controllers (ESCs) are the heart and soul of your drone's power system. It's a simple relationship: motors provide the thrust, and the ESCs translate signals from your flight controller into tiny, precise adjustments in motor speed.
When you're shopping for motors, the two specs that matter most are stator size and KV rating.
Stator Size: This is written as two numbers (like 2207 or 2306) and tells you the motor's width and height. A bigger stator generally means more torque, which is fantastic for swinging heavier props with authority. A 2207 or 2306 motor is a killer starting point for any 5-inch build.
KV Rating: This number tells you how fast the motor wants to spin per volt you feed it. For a 6S battery setup (which is the modern standard), a KV somewhere between 1700-2000 is the sweet spot for most freestyle pilots.
Your ESCs need to be able to handle the amperage your motors are going to pull under load. Today, a 4-in-1 ESC is the only way to go. It combines four individual ESCs onto a single board, which cleans up your wiring and makes the whole build much neater. For a typical 5-inch freestyle quad, look for an ESC rated for at least 45A-55A.
The Flight Controller: The Brain of the Operation
The Flight Controller (FC) is the central computer of your drone. It takes the commands from your radio, processes data from its internal gyroscope, and then tells the ESCs exactly what to do thousands of times per second. This is the component that runs the firmware, like Betaflight, which you'll spend time configuring.
Pro Tip: I can't recommend this enough—buy your FC and 4-in-1 ESC together as a "stack." These are designed to be paired, often connecting with a simple plug-and-play harness. This dramatically cuts down on the amount of soldering and potential headaches during assembly.
Look for an FC with an F4 or F7 processor. An F7 is technically more powerful and gives you more headroom for the future, but a modern F405 processor is more than capable for 99% of pilots out there. Just make sure it has enough UARTs (serial ports) for all the things you want to connect, like your receiver, VTX, and maybe a GPS module.
FPV System: Your Eyes in the Sky
This system is what puts the "First-Person View" in FPV. It's a team of three components working in perfect harmony:
FPV Camera: This captures the live video from the nose of your drone. A quality sensor that performs well in low light can be a real game-changer.
Video Transmitter (VTX): This takes the video feed from your camera and broadcasts it as a radio signal. Key specs here are its max output power (measured in milliwatts, or mW) and whether it's an analog or digital system.
Antenna: Never cheap out on your antenna! A good one is absolutely critical for a clean, reliable video link.
The biggest decision you'll make here is choosing between an analog or digital FPV system. Digital systems, like those from DJI or HDZero, deliver absolutely stunning HD video but come at a premium price. Analog is much more affordable, has incredibly low latency, and is famous for how gracefully the signal degrades—you get static and snow instead of a frozen frame, which many pilots prefer.
If you're looking for a complete overview of all the parts that make a quad tick, our comprehensive FPV drone build guide is a great place to get more tips and tricks.
To help you get a clearer picture of how these parts fit together, here's a quick reference table breaking down the core components.
FPV Drone Component Selection Guide
Component | Primary Function | Key Considerations (e.g., Size, Protocol, Rating) | Impact on Flight |
|---|---|---|---|
Frame | Provides structural support and protection for all other components. | Propeller Size (e.g., 5-inch), Arm Thickness (e.g., 5mm), Layout (e.g., True-X) | Dictates durability, weight, and flight characteristics (agility vs. stability). |
Motors | Generate thrust by spinning propellers. | Stator Size (e.g., 2306), KV Rating (e.g., 1950KV) | Determines power, torque, and efficiency. Affects responsiveness and top speed. |
ESC | Controls the speed of each motor based on flight controller signals. | Amperage Rating (e.g., 50A), Form Factor (4-in-1), Firmware (BLHeli_32) | Ensures smooth power delivery. Must handle the motor's max current draw. |
Flight Controller | The "brain" that processes inputs and controls the drone's movement. | Processor (F4/F7), Gyro (IMU), Number of UARTs | The core of flight performance. A faster processor allows for smoother flight. |
FPV Camera | Captures the live video feed. | Sensor Type (CMOS), Field of View (FOV), Form Factor (Micro/Nano) | Your view of the world. Affects image quality, especially in challenging light. |
VTX | Transmits the video signal from the camera to your goggles. | System (Analog/Digital), Output Power (mW), Connector (MMCX/U.FL) | Determines the range and clarity of your video link. |
Receiver | Receives commands from your radio controller. | Protocol (ELRS, Crossfire, Ghost), Size, Antenna Type | The link between you and your drone. Low latency is crucial for control. |
Choosing the right combination of these parts is the first major step in building a drone that truly feels like an extension of yourself. Don't be afraid to experiment as you gain more experience
Assembling Your Drone From Frame to Propellers
Alright, you've got a pile of carefully chosen parts sitting on your workbench. This is where the real fun begins—the physical build. It's the moment all those individual components start becoming a single, high-performance flying machine. Think of it like a high-tech model kit, but the prize at the end is a beast of a quadcopter that you built with your own two hands.
The whole process can look a bit daunting, especially with all the soldering involved, but it's really just a methodical, step-by-step assembly. Go slow, double-check everything as you go, and really soak in the satisfaction of seeing it all come together. A little patience now will pay off massively in reliability and performance down the line.
Laying the Foundation: The Frame and Motors
First things first, let's bring the drone's skeleton to life. If you haven't already, piece together the main plates and arms of your frame. Most kits have a diagram, but it's usually as straightforward as sandwiching the arms between the bottom and middle plates. Don't crank down on the screws just yet—leave things a little loose for now.
With the basic structure assembled, it's time to mount the motors. These almost always attach to the end of each arm with four screws. It's absolutely critical to use the correct length screws that came with your motors.
Screw Length Check: Before you tighten any motor screw all the way, do a quick check. Make sure the screw doesn't poke too far through the arm and into the motor's housing. A screw that's even a millimeter too long can shred the delicate copper windings inside, creating a dead short that will instantly fry the motor and likely your ESC.
A Dab of Threadlocker: Here’s a pro tip: put a tiny drop of blue threadlocker on each motor screw. The intense vibrations from an FPV quad can, and will, loosen screws over time. Threadlocker is cheap insurance against a motor coming loose mid-flight.
Once the motors are mounted, you can guide their three wires along the arms toward the center of the frame. A bit of electrical tape will do the trick, or you can use any plastic guards that came with your frame for a cleaner, more protected setup.
Installing the Brains and Brawn: Your FC Stack
The Flight Controller (FC) and the 4-in-1 ESC are the electronic heart and soul of your drone. If you bought them as a matched "stack," they're designed to connect together with minimal fuss. Start by pushing the long screws and rubber grommets through the frame's mounting holes. These little rubber bits are crucial for vibration damping.
Slide your 4-in-1 ESC onto the mounting screws first, then place the FC on top of it. Make sure those rubber grommets are seated properly. They isolate the flight controller’s gyro from frame vibrations, and a clean gyro signal is the secret to a smooth, locked-in quad.
Now for the skill that defines a drone builder: soldering. If you're new to this, grab some spare wire and a practice board and get a feel for it. The trick is to heat both the pad and the wire at the same time, then let the solder flow onto them to create a strong, shiny joint.
A "smoke stopper" is a non-negotiable tool for your first power-up. This little device sits between your battery and the drone. If there's a short circuit, it instantly cuts the power, potentially saving you from frying hundreds of dollars in brand-new electronics. Don't skip this.
Good wire management is what separates a decent build from a great one. Plan your wire routes before you cut anything to length. Twist related wires together (like the ones for your receiver) to help cut down on electrical noise and keep the inside of your build from looking like a rat's nest. The goal is wires that are just long enough to reach their destination without a bunch of extra slack.
This simple graphic shows the size difference between the two most popular frame classes, giving you a better sense of the platform you're putting together.
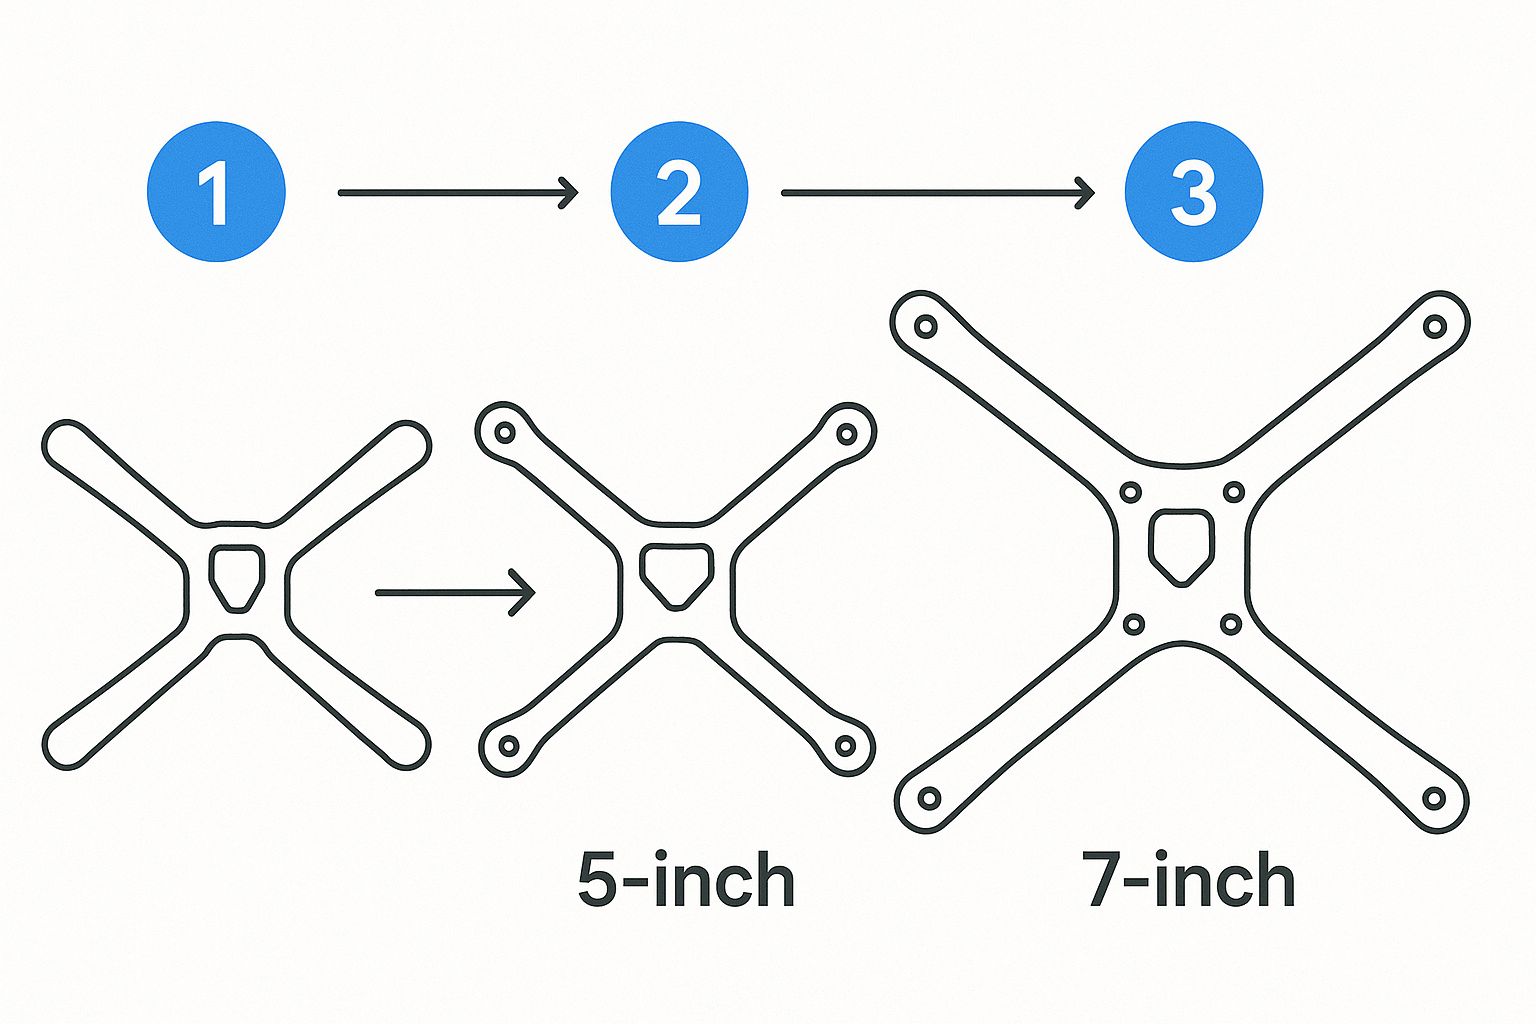
As you can see, a 7-inch frame offers a lot more real estate than a 5-inch one. That extra space is a huge deal if you're building for long-range flight, whereas the compact nature of a 5-inch is ideal for freestyle acrobatics.
Adding Your Eyes and Voice: Camera and VTX
Your FPV system is what puts you in the cockpit. This means getting your FPV camera installed up front and your Video Transmitter (VTX) mounted somewhere in the stack or at the rear of the drone.
Mount the Camera: Most frames include a 3D-printed or metal mount for the FPV camera. Get it secured firmly, but pay attention to the camera angle. For your first build, a gentle 10-15 degree upward tilt is a great starting point for learning.
Install the VTX: The VTX needs to be wired to your flight controller for power and to receive the video signal from the camera. Where you place its antenna is absolutely critical for performance and durability.
Secure the Antenna: Mount the VTX antenna securely at the back of the drone. You want it positioned so the carbon frame or the battery won't block its signal path. Use a solid 3D-printed mount and a zip tie to make sure it can't get sucked into the propellers during a crash. A broken VTX antenna will cause the transmitter to overheat and burn itself out in seconds.
After you've soldered the motor wires to the ESC and connected all your FPV gear, your build should be looking mostly complete. Now for the moment of truth before we jump into the software. Grab a multimeter and do a continuity check on your main battery leads to be certain there are no shorts between positive and negative. If that check passes, you're clear to plug in your battery (through your smoke stopper!) for the very first time. You should be greeted by a series of beeps from the motors—the sweet, sweet sound of a successful build.
Bringing Your Drone to Life with Betaflight
You've done the hard work—soldering, screwing, and assembling your quad until it looks like a proper FPV drone. But right now, it's just a cool-looking paperweight. To make it fly, we need to give it a brain. That brain is Betaflight.
Think of Betaflight as the operating system for your flight controller. It’s the open-source software that powers the overwhelming majority of FPV drones out there, and your job is to tell it exactly what kind of hardware it's running on. This might sound intimidating, but it's a surprisingly logical process. We'll connect to the drone, set up the basics, and get it ready for its first flight.
First things first, you'll need the Betaflight Configurator application. It's available for Windows, Mac, and Linux, so grab the latest version for your machine. Once it's installed, plug a USB-C cable into your flight controller and connect it to your computer.
When you open the app, you'll be greeted by this welcome screen.
This interface is your command center. I know all those tabs on the left look like a lot, but don't worry. We'll tackle the essential ones in order and have you ready to fly in no time.
Flashing Firmware and Initial Setup
Before we touch anything else, it’s a good habit to flash the latest stable version of Betaflight onto your flight controller. It ensures you have the newest features and bug fixes.
In the Configurator, without the flight controller connected, head over to the "Firmware Flasher" tab. From the dropdown menus, find your flight controller's target name (like "SPEEDYBEEF405V4") and select the latest stable firmware. Click "Load Firmware [Online]," wait for it to download, and then hit "Flash Firmware."
Once the flash is complete, you can finally click that "Connect" button. The first thing you should see is a 3D model of your drone. This is your first sanity check. Physically pick up your drone and tilt it forward, back, left, and right. The model on the screen should perfectly mirror its movements. If it’s off, you might need to adjust the board orientation in the "Setup" tab, but most modern FCs nail this automatically.
Next, we’ll visit the "Ports" tab. This is where you tell Betaflight which physical UARTs (the solder pads) are connected to your peripherals.
Receiver: Find the UART you soldered your receiver to (e.g., UART6) and flip the switch for "Serial RX" on that row.
VTX Control: If you wired your VTX for SmartAudio or Tramp control, find its UART and choose the correct protocol under the "Peripherals" dropdown.
GPS: For those who installed a GPS, locate its UART and select "GPS" from the "Sensor Input" dropdown menu.
Make sure to click "Save and Reboot" to lock in your changes.
Configuring Your Radio and Motors
Now, let's get your radio talking to the drone. Jump to the "Receiver" tab. Under "Receiver Mode," select "Serial (via UART)" and then choose the correct protocol for your system. For nearly all modern setups like ExpressLRS, this will be "CRSF".
Power on your radio transmitter. You should see the channel bars for Roll, Pitch, Yaw, and Throttle moving as you wiggle the sticks. If the wrong stick moves the wrong bar, just play with the "Channel Map" options until it matches (AETR1234 is a very common setting).
For those interested in pushing drone control to the next level, some advanced projects integrate single-board computers for custom flight missions. You can learn more in our guide to building a Raspberry Pi UAV.
The "Motors" tab is next, and this involves one of the most critical safety checks in the entire build. REMOVE YOUR PROPELLERS. I'm serious. Take them off now.
With the props off, you can safely plug in your LiPo battery.
Pro Tip: Always, always use a smoke stopper the first few times you plug a battery into a fresh build. It’s a cheap little device that can save you from frying expensive components if you have a hidden short circuit.
In the Motors tab, click the toggle that says "I understand the risks..." to enable motor control. Now, carefully raise the slider for each motor, one at a time. You need to confirm two things:
Motor Order: When you raise slider #1, does the motor at position #1 in the diagram spin up? Check this for all four motors. If they're out of order, the "Reorder Motors" tool will let you fix it.
Motor Direction: Is each motor spinning in the direction shown in the diagram? If one is spinning backward, you can easily reverse it using an online tool like ESC-Configurator or sometimes directly within Betaflight.
Getting the motor order and direction right is non-negotiable. If you get this wrong, your drone will violently flip over the second you try to arm it.
Setting Up Modes and Rates
We're almost there! The "Modes" tab is where you turn your radio's switches into useful functions. You must set up a switch for ARM. This is the master safety that allows the motors to spin. Without it, you're not flying anywhere.
I also strongly recommend setting up switches for these functions:
Angle/Horizon Mode: A self-leveling mode that's a godsend for your first few flights.
Beeper: Absolutely essential for locating your quad when it crashes in tall grass.
Flip Over After Crash: A magical feature that uses the motors to flip your drone upright, saving you the walk of shame.
Finally, pop over to the "PID Tuning" tab and find the "Rates" sub-tab. Rates control how sensitive the drone feels on the sticks. The default Betaflight rates are a fantastic starting point. As you gain confidence, you can slowly increase them to get those faster flips and snappier rolls, truly making the drone feel like an extension of your hands.
With all that configured, you're ready for the final pre-flight checks before the maiden flight
Mastering Your Pre-Flight Checklist

Alright, you’ve made it. The jump from the workbench to the wide-open sky is easily the most exciting—and nerve-wracking—part of any FPV build. Those final moments before a maiden flight are no time for guesswork. This is where a methodical, repeatable process becomes your best friend.
Think of this pre-flight checklist as your last line of defense against a silly, preventable, day-one crash. It's what turns the natural anxiety of that first flight into a controlled, confident launch. Don't ever skip these steps; this is what separates rookie mistakes from seasoned pilot habits.
The Physical Once-Over
Before you even think about plugging in a battery, give your drone a final, hands-on inspection. Vibrations are the mortal enemy of electronics and fasteners, and even the most solid build can have a screw work its way loose.
Start by gently tugging on each motor. Make sure it's firmly mounted to the arm with no wiggle. Then, check your frame screws, paying close attention to the ones holding the arms and top plate. They should feel snug, but don’t crank down on them so hard you risk cracking the carbon fiber.
Take a good look at your solder joints, especially the main battery leads and motor wires. You're looking for any dull, gray, or cracked joints that scream "cold solder joint." A weak joint like that can easily fail under the stress of flight. What you want to see are smooth, shiny connections.
Antenna Check: Are your VTX and receiver antennas securely mounted? Crucially, are they positioned well away from the propellers? A loose antenna is a fast track to a broken VTX or a sudden failsafe.
Propeller Installation: This is a classic "gotcha" for new builders, so pay attention. Double-check that your props are on for the correct motor rotation (props-out or props-in, matching your Betaflight config). Make sure those prop nuts are snug.
The Props-Off Bench Test
Now for the single most important safety check in this entire process: the props-off bench test. With your propellers REMOVED, set your drone on a stable, non-conductive surface.
Connect your battery (using a smoke stopper is still a great idea here) and power on your radio. Now, arm the drone. You should hear the motors spin up to their idle speed smoothly.
Slowly and deliberately, move your radio sticks one at a time:
Pitch Forward: The front two motors should spin up faster.
Roll Right: The two motors on the left should spin up faster.
Yaw Right: The front-right and rear-left motors (your clockwise spinners) should spin up faster.
If the drone responds correctly to every single input, it means your flight controller, gyro, and motor directions are all playing nicely together. I'm not kidding when I say this simple test catches over 90% of the issues that cause a quad to instantly flip over on takeoff.
It's a common rookie mistake to assume that because the motors spun correctly in the Betaflight configurator, they'll behave in the air. The props-off bench test is the only way to confirm the flight controller's gyro is responding properly to your stick commands before you commit to flight.
Failsafe and Systems Check
These last checks confirm your drone's safety systems are working and that you can actually see from the cockpit. Never, ever fly without testing your failsafe. With the drone still armed (and props still off!), simply turn off your radio transmitter.
After about a second, the motors should stop spinning completely. That's it. This confirms your failsafe is set up right, preventing a dreaded "flyaway" if you lose signal. Once you see it works, turn your radio back on, let it reconnect, and then disarm.
Finally, put on your FPV goggles. You should see a clear video feed and your On-Screen Display (OSD). Glance at the critical info:
Battery Voltage: Does it show a realistic voltage for a full pack?
Timer: Is your flight timer visible and ready to count?
Signal Strength: Is your RSSI or LQ value displayed and looking healthy?
For an even deeper dive into this crucial routine, you can explore our complete drone pre-flight checklist and safety tips for more pro advice.
Once all these checks are done, you're officially ready. It's time for your maiden flight.
Common Questions About Building FPV Drones
It's totally normal to have a flood of questions when you're staring at your first pile of drone parts. From soldering fears to figuring out the budget, every builder hits these same roadblocks. Let's tackle the most common questions head-on so you can get your build finished and in the air.
Trust me, even the most seasoned pilots started right where you are. The challenges are just part of the process, and overcoming them is what makes this hobby so rewarding.
What Is the Hardest Part of Building an FPV Drone?
For most newcomers, soldering is hands-down the most intimidating part of a build. The fear of frying a brand-new flight controller with a slip of the iron is real, but it's a skill you can pick up much faster than you might think.
A decent soldering iron, some quality solder, and a little practice on scrap parts will work wonders for your confidence. The secret is all in the technique: tin your wires and pads first, use plenty of flux to help the solder flow, and you'll be making clean, shiny joints in no time.
Once you conquer soldering, the next hurdle is usually software setup in Betaflight. Don't let it scare you. Most issues are just simple configuration mistakes that you can solve by methodically double-checking your work.
The biggest mistakes are almost always preventable. Things like skipping a smoke stopper on the first power-up, not checking motor direction before putting props on, or failing to test the failsafe are common pitfalls that a simple checklist can help you avoid.
How Much Does a Decent FPV Drone Cost to Build?
The price tag can swing quite a bit, but you can put together a really solid 5-inch freestyle drone for about $250 to $400. This covers just the drone itself—the frame, motors, flight controller stack, and FPV system.
Of course, that's just the quad. You'll also need the essential gear to actually fly it:
Radio Transmitter: Your controller for the drone.
FPV Goggles: How you see the live video feed.
LiPo Batteries & Charger: The fuel for your flights.
This support gear can easily add another $300 to $600+ to your startup costs. While it's tempting to grab the cheapest parts you can find, spending a little more on a quality flight controller, motors, and video transmitter pays off with a much more reliable and enjoyable experience. Better components also mean a cleaner video signal, which is absolutely critical for a good flight. You can learn more about this by mastering your drone's FPV range and seeing how hardware choices make a difference.
Ultimately, building your own FPV drone is a journey. Embrace the challenges, learn from your mistakes, and get ready for the unmatched thrill of flying a machine you built with your own two hands.
Comments