DIY Drone with Payload Release Build Guide
- Jab Media

- Sep 10, 2025
- 17 min read
Updated: Sep 11, 2025
A drone with a payload release isn't just a flying camera anymore; it's a tool. We're talking about an unmanned aerial vehicle that's been kitted out with a mechanism to carry and drop an object on command. This system, usually triggered from your remote, might use a tiny motor (a servo) or a magnet to let go of its cargo.
People are using these for everything from delivering emergency supplies and seeding fields to dropping a fishing line in the perfect spot. It fundamentally transforms a standard drone into a workhorse for a huge range of tasks.
Understanding Payload Release Mechanisms
Before you start pulling out your credit card and soldering iron, it’s crucial to get a handle on how these systems actually work. At its heart, a payload release mechanism is just a remote-controlled switch. It holds on tight during flight and lets go the instant you tell it to. The real trick is picking the right type of mechanism for what you want to accomplish.
Think of it like choosing any other tool from your toolbox. You wouldn't use a sledgehammer to tap in a finishing nail, right? The same logic applies here. Your choice will directly impact the reliability, safety, and ultimate success of every single mission you fly.
Balancing Weight and Stability
The single most critical factor to get right is the relationship between your drone's lift capacity and the payload's weight. Overloading a drone is a surefire recipe for disaster. It absolutely kills your flight time, makes the controls feel sluggish and unresponsive, and can easily lead to an unstable flight that ends in a crash.
Always, always respect your drone's maximum takeoff weight (MTOW). I personally recommend keeping your total payload under 70% of the drone's max rated capacity to leave a healthy margin for safety.
This isn't just about raw lift, either. It's about balance. An off-center payload can make a drone almost impossible to fly as the flight controller works overtime just trying to keep the aircraft level. Your release mechanism has to be mounted as close as possible to the drone’s center of gravity to keep things stable, both before and after you make the drop.
Common Release System Designs
Two designs really dominate the DIY and prosumer world: servo-driven hooks and electromagnetic locks.
Servo-driven systems are what you'll see most often in the hobbyist community. They use a small motor to rotate an arm or a pin, which physically unlatches whatever is holding the payload. They're light, cheap, and pretty easy to program. For instance, a simple servo can be told to rotate 90 degrees to open a clasp—perfect for dropping a water balloon or a baited fishing line.
Electromagnetic systems are a much more robust solution, especially for heavier or mission-critical payloads. These use a powerful magnet that holds onto a metal plate attached to the payload. When you're ready to drop, you just cut the power, and the object is instantly released. While they're a bit heavier and cost more, they offer a nearly foolproof release and can handle bigger loads without the risk of a mechanical part jamming up. This makes them the go-to for tasks like deploying agricultural sensors or delivering emergency supplies.
This image gives a great visual breakdown of how a drone's airframe design influences its payload capabilities and drop precision.
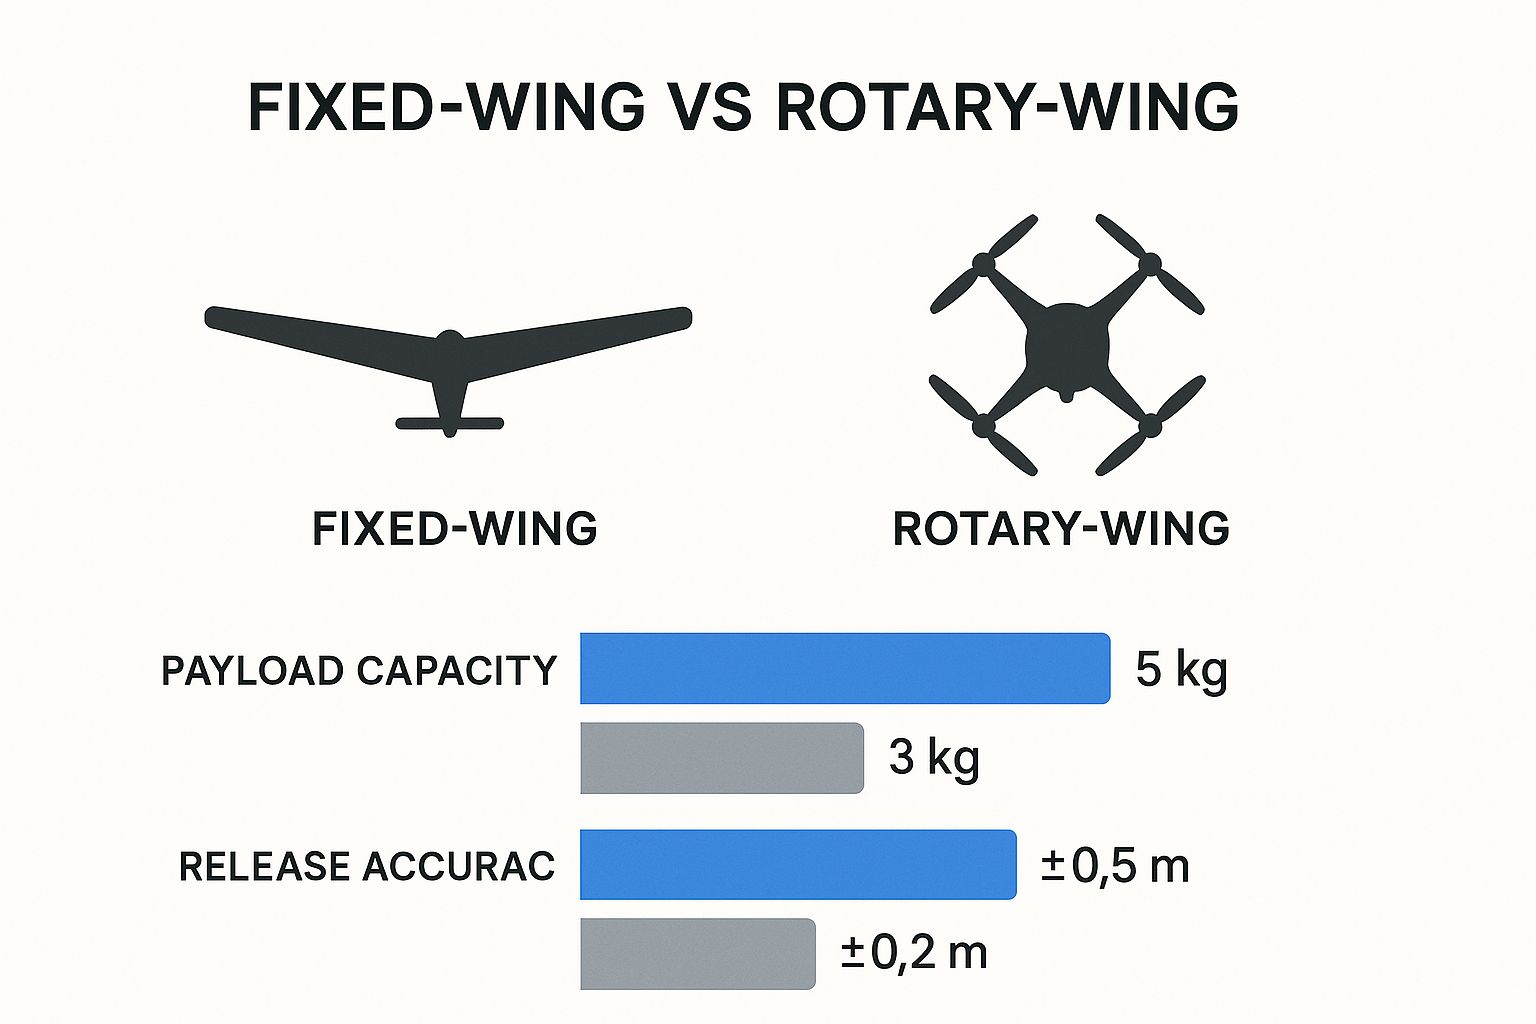
As the data shows, fixed-wing drones might carry more, but rotary-wing drones (like quadcopters) give you far better accuracy when you need to hit a specific target. That’s a key trade-off to consider.
Key Takeaway: Your payload release mechanism has to match the mission. A simple servo is fantastic for light, recreational fun, but an electromagnet delivers the rock-solid reliability you need for professional or critical drops. Getting this foundational choice right will guide every other decision you make in your build.
Comparing Payload Release Mechanisms
Deciding between a servo, an electromagnet, or another type of release mechanism can be tough. It really boils down to your specific mission, budget, and how much complexity you're willing to tackle. This table breaks down the most common options to help you choose the best fit for your project.
Mechanism Type | Activation Method | Best For | Complexity | Cost |
|---|---|---|---|---|
Servo-Driven Hook | Rotational motor movement | Light payloads, hobby projects, fishing, recreational drops | Low | $ |
Electromagnetic Lock | Electrical current (On/Off) | Heavier or critical payloads, professional use, fail-safe delivery | Medium | $$ |
Pin Release | Linear servo movement | Simple, lightweight drops where a pin is pulled to release the payload | Low | $ |
Gripper/Claw | Servo or motor-driven jaws | Picking up and dropping objects of various shapes, search and rescue scenarios | High | $$$ |
As you can see, the simple servo hook is a great starting point for most people. But if you're planning on carrying something valuable or heavy, investing in the reliability of an electromagnetic system is well worth it. Your payload and your mission will ultimately tell you which direction to go.
Sourcing Parts for Your Release System
Alright, you've got the mechanics figured out. Now it's time to turn that concept into a real-life shopping list. This is the fun part, where your drone with a payload release starts to feel tangible. But before you start filling up online shopping carts, we need to do one crucial calculation to keep things safe and reliable.
First, figure out the absolute maximum weight you plan on carrying. Got it? Now, double it. This 2x safety margin isn't just a suggestion; it's a hard rule for me. It accounts for all the dynamic forces your drone will face in the air—things like turbulence or a sudden burst of acceleration that can momentarily spike the strain on your gear. A mechanism rated for exactly 2 kg might give out when a 2 kg payload gets jostled around during a sharp turn.
Selecting Your Core Components
Once you know your required strength, you can pick the heart of your release system. For most DIY builds, a servo-driven mechanism gives you the best bang for your buck in terms of cost, simplicity, and reliability. A true workhorse I’ve relied on for countless projects is the MG996R metal-gear servo. It’s cheap, you can find it anywhere, and those metal gears provide the durability you need to handle stress over and over again.
Of course, the servo needs a brain to tell it what to do. An Arduino Nano or a similar microcontroller is perfect for the job. It's tiny, dead simple to program, and can be powered straight from your drone's flight controller or a small, separate battery. This little board is what will listen for the signal from your remote and command the servo to open or close.
Here’s a quick-and-dirty checklist of the parts you’ll probably need to grab:
High-Torque Servo: The MG996R or an equivalent with metal gears is a solid bet for payloads up to 3 kg.
Microcontroller: An Arduino Nano, Pro Mini, or even a simple ESP8266 will get the job done.
Mounting Hardware: Get an assortment of M3 screws, nuts, and standoffs. You'll need them to secure everything to your drone's frame.
Wiring: I like to use 22-26 AWG silicone wire. It’s flexible and tough, which is exactly what you want for connecting components on a drone.
Power Source: A 5V BEC (Battery Eliminator Circuit) is the cleanest way to power your servo and microcontroller from the drone’s main LiPo battery.
If you're just getting into building drones, rounding up all these individual bits and pieces can feel like a lot. Our guide on assembling a DIY drone kit for beginners breaks down the fundamental components, which can really help simplify this sourcing stage.
Finding Quality Parts and Custom Solutions
You can find most of these standard components on sites like HobbyKing, GetFPV, and even Amazon. As you shop, keep a close eye on the servo's torque rating (it's listed in kg-cm) and the microcontroller’s voltage needs. I always make it a point to skim user reviews to see how a part holds up in the real world before I click "buy."
A classic rookie mistake is grabbing the cheapest servo you can find. A plastic-geared servo might seem fine on your workbench, but I guarantee it will be a major point of failure once it's in the air. Spending a few extra bucks on a metal-geared model is probably the best investment you can make for your build's lifespan.
For the physical release mechanism itself—the actual hook, clasp, or pin—you have a couple of great options. You could machine one out of lightweight aluminum, but the more popular route these days is 3D printing. A 3D printer lets you design and create a custom part that fits your drone frame and servo like a glove.
When you're printing functional parts for a drone, the material you choose is critical.
PLA: It's super easy to print with but can be brittle. I use it for prototyping, but never for a final part that’s actually going to fly.
PETG: This is my go-to material. It has a fantastic balance of strength and flexibility, making it perfect for absorbing the vibrations and shocks of flight.
ABS: Incredibly strong and durable, but it can be a real headache to print without it warping.
You don't have to be a CAD wizard to get started, either. Websites like Thingiverse and Printables are treasure troves of pre-made, user-tested payload release designs that you can download for free. Just find a model that matches your servo and drone, download the file, and send it to your printer. This approach saves a ton of time and lets you build on the success (and failures) of the wider drone community.
Alright, you’ve got a box of parts and a solid plan. Now for the fun part: the hands-on assembly where all those components become a working payload release system on your drone.
This is where the magic happens, but it demands careful, methodical work. We’ll start by getting the physical hardware mounted, then move on to wiring everything up. The goal is a clean, rock-solid installation. A sloppy build with loose wires or an off-center mechanism is just asking for a mid-air failure. We're aiming for something that looks professional and performs perfectly flight after flight.
Physically Mounting the Mechanism
First up, let's get the release mechanism physically attached to the drone's frame. The most important rule here is balance. You have to mount the mechanism as close to the drone's center of gravity (CG) as you can get. An imbalanced drone is an unstable one, and it forces your motors and flight controller to work overtime just to keep the aircraft level.
I always start by finding the CG with the battery installed, since that’s its true flight weight. Mark that spot. Your payload needs to hang directly below this point to maintain stability. Go ahead and secure your 3D-printed mount to the drone’s bottom plate using M3 screws and nylon lock nuts. Get it snug, but don't crank down so hard you crack the carbon fiber. You want it completely firm with zero wobble.
Here's a pro tip I swear by: use a tiny dab of medium-strength (blue) threadlocker on your mounting screws. Drone vibrations are notorious for shaking hardware loose over time, and the last thing you want is your entire payload system detaching mid-flight.
With the mount on, it's time to install the servo. Make sure it’s seated securely and its rotating arm—the servo horn—can move through its full range without hitting anything. Attach your hook or pin to the horn and give it a few manual tests. It should open and close smoothly without binding on the frame or landing gear.
Wiring the Electronics for Control
Hardware is in place. Let's bring it to life. The wiring process connects the servo to your microcontroller, which then gets linked to a spare channel on your drone's receiver. This creates a simple command chain: you flip a switch on your remote, it sends a signal to the receiver, the receiver talks to the microcontroller, and the microcontroller tells the servo what to do.
Good soldering is absolutely critical for any drone. A cold solder joint might look fine on your workbench, but it can easily fail under the intense vibration of flight.
Prep Your Wires: Strip just a tiny bit of insulation (about 2-3mm) off the wire ends and "tin" them with a little solder. Do the same for the pads on your Arduino.
Make the Connection: Heat both the pad and the tinned wire at the same time, then touch your solder to the joint. It should flow instantly, creating a shiny, clean connection.
Protect Your Work: Slide heat-shrink tubing over every single solder joint. This is non-negotiable. It insulates the connection to prevent shorts and provides much-needed strain relief.
You'll have three main connections going from the servo to the microcontroller:
Signal Wire (Usually Yellow or White): This goes to a digital pin on the Arduino (Pin D9 is a popular choice).
Power Wire (Red): Connect this to the 5V output pin on the Arduino.
Ground Wire (Black or Brown): This connects to any GND pin on the Arduino.
Next, you need to connect the Arduino to an open channel on your radio receiver. I usually look for an unused auxiliary channel like 6 or 7. You’ll connect the receiver's signal pin for that channel to another digital pin on your Arduino (like Pin D2), and then share the 5V and Ground from the receiver to power the whole board.
Managing Wires for Safety and Reliability
A rat's nest of wires isn't just ugly; it's a serious safety risk. Loose cables can get snagged, and in a worst-case scenario, tangled in a propeller. Clean wire management is the mark of a well-built drone.
Start by cutting all your wires to the exact length you need—nothing more, nothing less. Any extra length just adds weight and clutter. I like to gently twist the servo and power leads together, which can help cut down on electromagnetic interference that might mess with your GPS or other sensitive electronics.
Use small zip ties or braided sleeving to bundle your wires neatly and anchor them to the drone frame. Keep everything far away from props, motors, and antennas. A clean wiring job doesn't just look professional; it makes future maintenance a thousand times easier. This careful approach is what makes a drone with payload release not just functional, but truly dependable.
Configuring the Software and Remote Control
With the physical build behind you, it's time to bring your payload release system to life with software. This is where the magic happens—turning a simple flick of a switch on your remote into a precise, real-world action.
Whether you're using a standalone Arduino or plugging directly into your drone's flight controller, the goal is the same: creating a responsive and totally reliable release mechanism. The path you choose really just depends on your drone's current setup and your comfort level with the tech.
Programming a Standalone Arduino Controller
Using a dedicated microcontroller like an Arduino is a fantastic way to control your servo. It keeps the whole payload system completely separate from your drone’s main flight controls, which is a huge plus if you're just starting out and want to keep things simple.
The logic is pretty straightforward. The Arduino just sits there listening for a specific signal from your radio receiver, and when it hears it, it tells the servo to move to a pre-set position.
Here’s a basic code snippet you can upload to an Arduino Nano using the Arduino IDE. This little script is designed to listen to an input pin (D2) from your receiver's auxiliary channel and control a servo connected to another pin (D9).
#include <Servo.h>
Servo payloadServo; // Create a servo objectint channelPin = 2; // Pin connected to the receiver channelint servoPin = 9; // Pin connected to the servo's signal wire
int lockedPosition = 10; // Servo angle for the 'locked' positionint releasedPosition = 120; // Servo angle for the 'released' position
void setup() { payloadServo.attach(servoPin); // Attach the servo to its pin pinMode(channelPin, INPUT); // Set receiver pin as an input payloadServo.write(lockedPosition); // Start in the locked position}
void loop() { int pulse = pulseIn(channelPin, HIGH, 25000); // Read the receiver signal
// A typical RC signal is ~1500µs at neutral. We'll use >1700µs as the trigger. if (pulse > 1700) { payloadServo.write(releasedPosition); // Move to release position } else { payloadServo.write(lockedPosition); // Return to locked position } delay(20); // Small delay for stability}
The most important variables here are lockedPosition and releasedPosition. You'll definitely need to tinker with these values to find the perfect angles for your specific mechanism. The goal is to get it to open and close fully without straining the servo motor.
Integrating with Your Flight Controller
For a sleeker, more advanced setup, you can ditch the Arduino entirely and control the servo directly from your flight controller. Firmware like Betaflight and ArduPilot have built-in functions to manage servos, which you can then map to any switch on your remote control.
To pull this off, you'll first need to solder the servo's signal wire to an unused motor or PWM output pad on your flight controller. Once that's done, you'll connect to the configuration software (like the Betaflight Configurator) and follow a few general steps:
Enable Servo Tilt: Head to the Configuration tab. You’ll likely need to flip a switch here to allow the flight controller to output servo signals.
Map the Servo: In the Servos tab, you’ll assign the servo to the physical pin you just soldered it to.
Assign to an AUX Channel: Finally, jump over to the Modes tab. This is where you link the servo’s action to an auxiliary (AUX) switch on your transmitter and define its range of motion.
This direct integration is incredibly powerful, but it does require a bit more technical know-how. If you're new to this side of things, it might be worth checking out a guide on https://www.jabdrone.com/post/how-to-fly-a-drone-for-beginners-get-started-today to get comfortable with the basic software concepts first.
The number one mistake I see people make is burning out their servo. This almost always happens when the servo's endpoints are set incorrectly, causing it to constantly strain against its physical limits. Always set your servo's range of motion in the software to be slightly less than its mechanical maximum.
Getting your remote control channels set up correctly is critical for reliable control. Taking some time for understanding the basics of radio communication will give you a solid foundation here. Once everything is configured, you'll have a fully functional drone with payload release ready for action.
Field Testing Your Payload System Safely

Alright, this is where theory meets reality. Moving your creation from the workbench to the open sky is easily the most critical part of the entire project. Think about it: a small glitch on the ground is just an annoying fix. That same glitch in the air can mean a total loss.
This is why a rigorous, multi-stage testing process isn't just a suggestion—it’s absolutely mandatory. Rushing this is a rookie mistake that almost always ends with broken parts or worse. We’re going to break this down into a few distinct phases: bench checks, static load testing, and finally, your first controlled flights.
Ground-Based System Checks
First things first: power up the drone, but take the propellers completely off. This is non-negotiable. With the props removed, you can safely cycle the entire release system without any chance of the drone suddenly deciding to redecorate your ceiling.
Now, with a battery plugged in, flick the switch on your remote that triggers the release mechanism. Do it over and over again, at least 20-30 times. You're listening for a clean, crisp "thwack" from the servo and watching for smooth, identical movement every single time. Any buzzing, hesitation, or jerky motion is a huge red flag. Sort it out now, not later.
My Personal Rule: If a mechanism doesn't work perfectly 30 times in a row on the bench, it has no business being in the air. This simple test has saved me from countless potential in-flight failures over the years.
While you're at it, give every single wire and solder joint a gentle tug. Make sure everything is rock-solid. You'd be surprised what can come loose during assembly.
Verifying Strength with Static Load Tests
Once you’re confident the electronics are behaving, it’s time to see if your build can actually handle the weight. The static load test is all about confirming your 3D-printed parts and mounting hardware can hold the payload without showing any signs of stress.
Start by hanging a weight from the mechanism that equals 100% of your target payload. Let it hang there for a solid five minutes. Then, get in close and inspect every part of the mount, the servo, and the release hook. Look for any bending, cracking, or discoloration that indicates stress.
If it passes that test, up the ante. Increase the weight to 125% of your max payload. This extra margin is crucial because it accounts for the dynamic G-forces and vibrations the drone will experience in flight.
This kind of robust testing is becoming more important every day. The global drone payload market is projected to explode from USD 10.5 billion in 2023 to USD 33.9 billion by 2032, according to insights on custommarketinsights.com. That growth is happening because people are building reliable systems.
Executing Controlled Flight Tests
Okay, you've passed the ground checks. Find a wide-open field, far away from people, buildings, or anything you don't want to accidentally drop something on. For your very first flights, use a payload that’s only about 50% of your maximum target weight. A lighter load makes the drone much more forgiving as you get a feel for its new handling.
Before any payload mission, I run through a quick checklist. It's a simple habit that prevents simple mistakes.
Payload Mission Pre-Flight Checklist
A simple checklist to run through before any flight involving a payload release. Don't skip these steps.
Check Item | Status (Pass/Fail) | Notes |
|---|---|---|
Props and Motors Secure | ||
Battery Fully Charged | ||
Payload Securely Attached | ||
Release Mechanism Responds | ||
GPS Lock Acquired | ||
Failsafe/RTH Verified | ||
Airspace Clear |
Once you've run through the checklist, you're ready to get airborne.
Start with a simple, low hover at about 10-15 feet. Just watch and listen. Does it drift more than usual? Do the motors sound like they’re straining? Fly some gentle patterns—forward, backward, side-to-side—to feel how the extra weight has changed its responsiveness.
Only when you're comfortable with how it flies should you test the release. Fly out to a safe spot, hover, and hit the switch. Pay close attention to how the drone reacts. It will probably jump up a bit when the weight is gone—that's completely normal. Practice this a few times, then gradually increase the payload on subsequent flights until you reach your maximum target.
Speaking of failsafes, it's vital to have your Return to Home set correctly for any complex flight. You can find a complete guide on how to properly set up a safe drone return to home function on our blog.
Common Questions About Payload Drones
Even when you've double-checked every connection and feel like your release mechanism is solid, questions will inevitably pop up. Building a reliable payload drone is a game of fine-tuning, testing, and troubleshooting. I've been there.
To save you some headaches, I've gathered answers to some of the most common questions I get from other builders. These are the real-world issues that can make or break a mission. Getting these details right is what helps push the entire drone payload market forward, a market valued at around USD 7.2 billion in 2024 and projected to hit an incredible USD 18.6 billion by 2031. It’s builders like us, refining our systems, that are fueling that growth. You can dig into more insights on the drone payload market if you're curious.
What Is the Most Common Point of Failure?
Hands down, the servo is the usual suspect. I’ve seen it countless times: a builder tries to save a few bucks with a cheap, plastic-geared servo. It might work fine on the bench, but once you combine the strain of a real payload with in-flight vibrations, those plastic gears strip out in a heartbeat. That’s exactly why I always recommend a quality, metal-geared servo like the MG996R.
Another big one is a weak power supply. A servo under load can draw a surprising amount of current. If your BEC (Battery Eliminator Circuit) isn't up to the task, the voltage will sag, and the servo will either stutter or fail completely—right at the moment you need it most. Make sure your BEC can supply at least 2-3 amps more than the servo’s rated stall current.
How Do I Prevent Accidental Drops?
An accidental drop is every builder’s worst nightmare. The best way to prevent this is through a smart combination of software configuration and how you set up your radio transmitter. My go-to method is a two-step activation process.
It looks something like this:
Arming Switch: Dedicate one switch to "arming" the payload release system. The release won't do anything until this is flipped on.
Release Button: Use a separate momentary switch or button to actually trigger the drop.
With a setup like this, it’s virtually impossible to drop the payload just by bumping a single switch. It’s a simple safety layer that gives you incredible peace of mind.
Pro Tip: Take it one step further when programming your radio. Add a slight delay or a "long press" function to the release button. This makes sure the action is deliberate, not just a fleeting, accidental tap on the control.
How Does a Payload Affect Flight Time?
There’s no getting around it—a payload will absolutely slash your flight time. The heavier the load, the harder your motors have to work, which in turn pulls a whole lot more current from your battery.
As a general rule, adding a payload that’s 50% of your drone’s maximum takeoff weight can cut your flight time by 40-60%. This is why you must conduct test flights with dummy weights. It’s the only way to get an accurate feel for how a specific payload will drain your battery before you fly a real mission.
Flying with a payload also demands more situational awareness. Knowing how to read your environment is critical, and you can sharpen those skills with our guide on how to read sectional charts for drone pilots. It’s essential knowledge for operating safely, especially in controlled airspace.
Here at JAB Drone, we're all about empowering builders and pilots with the knowledge to push what's possible. Explore more expert guides, reviews, and DIY projects at https://www.jabdrone.com to take your skills to the next level.

Comments