How to Read Sectional Charts: A Drone Pilot's Essential Guide
- Paul Simmons

- Sep 1, 2025
- 13 min read
Learning to read a sectional chart is all about translating its colors, lines, and symbols into a clear picture of the airspace, terrain, and any obstacles you might encounter. It really boils down to three key skills: decoding the legend, identifying airspace classes, and pinpointing ground features. Nail these, and you're well on your way to a safe, compliant flight.
Why Sectional Charts Matter for Drone Pilots
Pop open a sectional chart for the first time, and it’s easy to feel overwhelmed. It looks like a chaotic mess of lines, numbers, and colors. I’ve seen plenty of new drone pilots glance at one and dismiss it as a tool for "real" pilots in traditional aircraft, but that’s a huge mistake.
For any remote pilot, getting comfortable with sectional charts is one of the most critical safety skills you can build. Think of it as your only way to see the invisible structures that govern the sky.
It’s the ultimate pre-flight briefing document, all in one place. These charts give you a clean, top-down view of your operating area, showing you everything from nearby airports to potential ground hazards that could ruin your day.
A sectional chart isn't just a map; it's a situational awareness tool. It tells you where you can fly, what altitudes are safe, and what potential conflicts you need to manage before your props ever start spinning.
Getting a handle on these charts is non-negotiable if you want to fly both safely and legally. Here’s exactly why it’s so important:
Airspace Awareness: It's the only way to truly visualize the boundaries of different airspace classes—like Class B, C, or D—which directly impacts whether you need FAA authorization to fly.
Obstacle Avoidance: Charts clearly mark potential hazards like towers, tall buildings, and other obstructions. They even give you the height in both MSL (Mean Sea Level) and AGL (Above Ground Level), so there are no surprises.
Legal Compliance: Taking off without understanding the airspace is a fast track to a friendly chat with the FAA. A sectional chart is your best friend for staying compliant.
The idea of mapping the skies isn't new; it has a rich history that stretches back to the early 20th century. The sectional charts we use today really took off in the U.S. after Charles Lindbergh's 1927 transatlantic flight made it painfully clear that pilots needed better navigation tools. You can dive deeper into the history of aeronautical charts and see how they’ve evolved.
Understanding this foundation gives you the power to plan your missions with confidence and steer clear of dangerous situations.
Decoding Key Symbols and Chart Legends
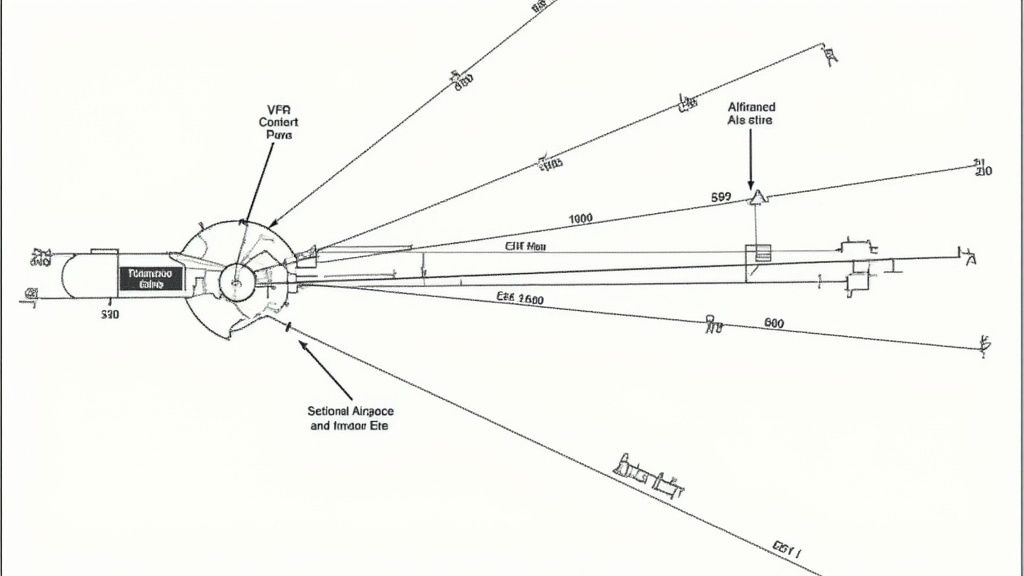
Think of the chart legend as your Rosetta Stone for learning how to read a sectional. It’s the key that translates every symbol, line, and color into real-world information you can actually use.
While the full legend is jam-packed with details, from VORs to isogonic lines, drone pilots can zero in on a few critical areas. Your immediate focus should be on airports and obstructions. These two categories represent the most common potential conflicts you'll face out in the field, so getting them right is fundamental to safe flight planning.
Airports and Their Meanings
The first thing you’ll probably notice is that airports aren't all marked the same way. The symbol’s shape and color tell a story, giving you vital intel at a glance. For instance, a blue airport symbol means it has a control tower, while a magenta one does not.
That’s a massive distinction for any drone pilot. Flying near a towered airport often means you're dealing with controlled airspace and will need something like a LAANC authorization to fly. A non-towered airport might seem less regulated, but it comes with its own set of challenges, like trying to anticipate unpredictable manned aircraft traffic patterns.
Blue Airport Symbol: This marks a towered airport, operating within controlled airspace like Class B, C, or D. Expect active air traffic control and plan accordingly.
Magenta Airport Symbol: This is a non-towered airport, usually found in Class G or E airspace. Manned aircraft pilots self-announce their positions here.
"R" within the Circle: A circle with an "R" inside tells you it's a private airport. You absolutely should not plan to operate from a private field without getting explicit permission from the owner first.
You might also see a little star on top of an airport symbol. That just means it has a rotating beacon, which helps pilots spot it from the air, especially as the sun goes down. It’s these small details that give you a quick, high-level picture of the aviation activity in your area.
Spotting Ground-Based Obstructions
Once you've mapped out the airports, your next priority is to spot anything sticking up from the ground. Sectional charts are covered in symbols for cell towers, wind turbines, and other tall structures that could pose a serious risk to your drone.
The main symbol for an obstruction looks a bit like a tiny tripod or tower. Right next to it, you’ll find two crucial numbers.
The top number, in bold, is the obstacle's height in Mean Sea Level (MSL). The number just below it, in parentheses, is its height in Above Ground Level (AGL). As a drone pilot, that AGL value is your bread and butter.
Let’s say you see a tower marked 1495 (499). This means the very top of that tower is 1,495 feet above sea level and 499 feet above the ground directly beneath it.
Since your Part 107 rules generally keep you at or below 400 feet AGL, this symbol immediately tells you to stay well clear of that structure. Some of these symbols even have little lightning bolts, indicating high-intensity lighting—another visual cue to be aware of. Mastering these symbols is what turns a flat map into a 3D hazard assessment tool.
Mastering Airspace for Safe Drone Flights
Getting a handle on the airspace above you isn’t just about passing the Part 107 exam—it’s the absolute core of flying your drone safely and legally. When you first look at a sectional chart, the mess of blue and magenta lines, circles, and numbers can feel a bit overwhelming. But for a drone pilot, those markings are your roadmap to knowing exactly where you can fly and when you need to ask for permission.
Think of these lines less as restrictions and more as a shared language between you, air traffic control, and every manned aircraft in the sky. Each class of airspace has its own rules of the road, and knowing how to read them on a chart is what separates a professional, prepared pilot from one who’s just guessing.
Decoding Airspace Boundaries
The most common types of controlled airspace you'll bump into around towns and cities are Class B, C, and D. Each one is drawn differently on your sectional chart, and you need to know what they mean at a glance.
Class B (Bravo): Look for the solid blue lines. This is the big league—the super busy airspace around major international airports. It’s often shaped like an upside-down wedding cake, with layers stacking up to 10,000 feet MSL (Mean Sea Level). Flying here is tough and requires a lot more than a simple automated approval.
Class C (Charlie): These are marked with solid magenta lines. You'll typically find this airspace around busy airports that have regular commercial flights but aren't quite at the international hub level. It’s smaller than Class B, usually with two distinct layers.
Class D (Delta): A dashed blue line is your signal for Class D airspace. This is a very common one, surrounding smaller airports that have an operating control tower. The ceiling is usually printed inside the line in hundreds of feet, like , which means the airspace goes up to 2,500 feet MSL.
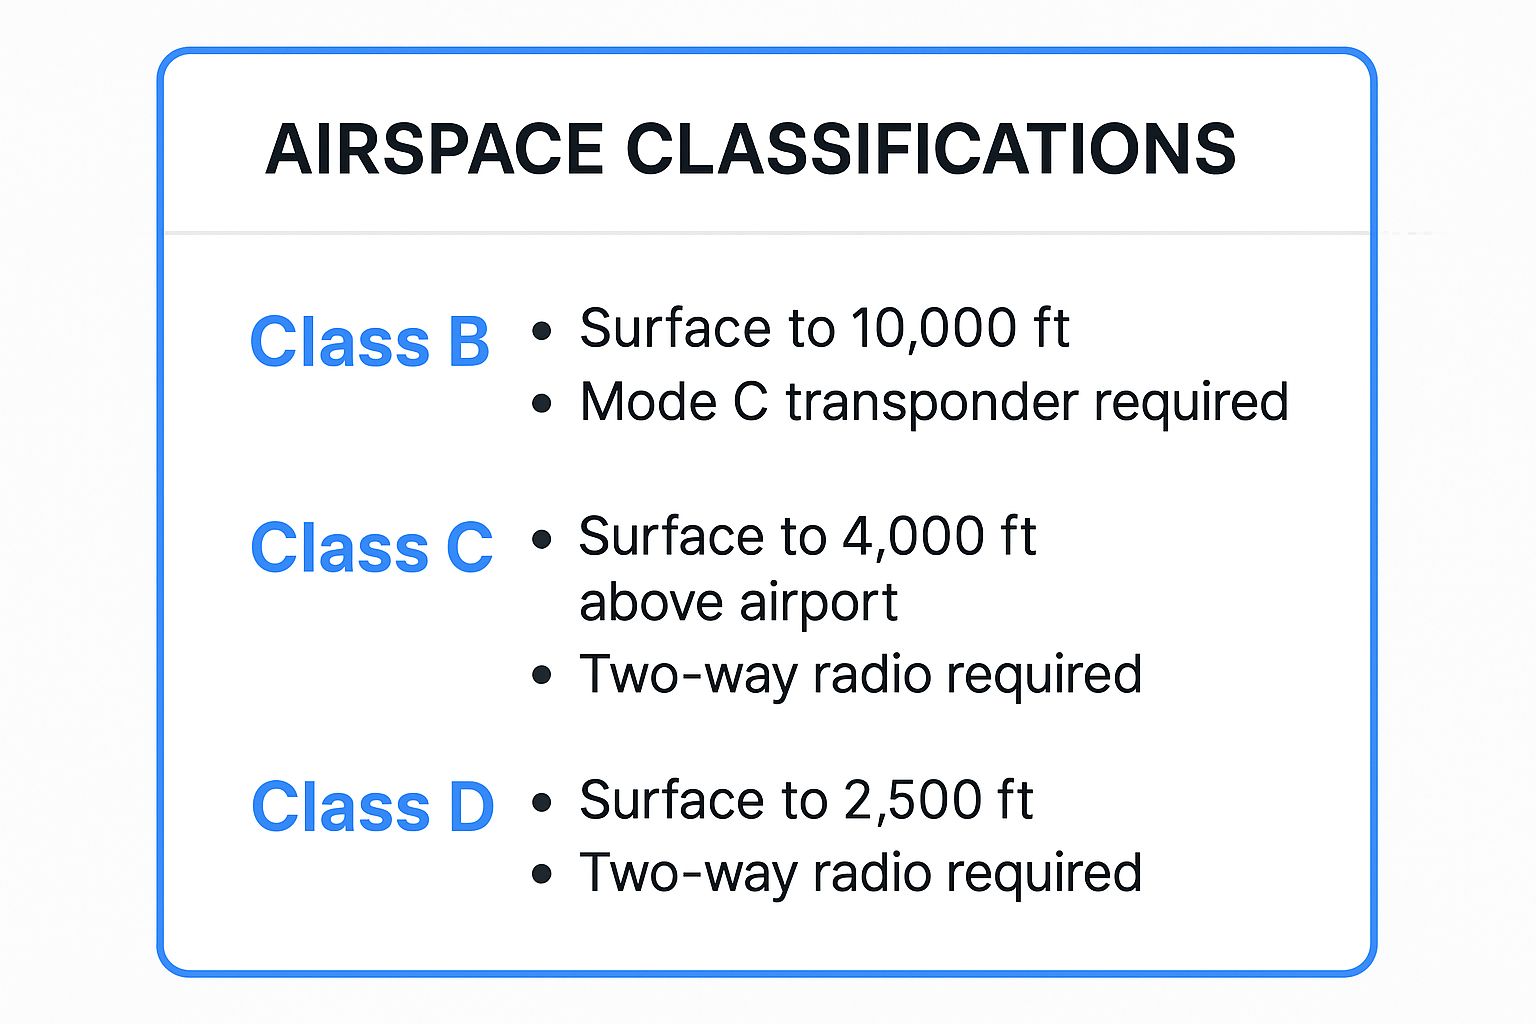
This quick visual guide is a great starting point. As you can see, the complexity and air traffic ramp up significantly as you move from D to B, which is why the rules get stricter.
To help you keep these straight, here’s a quick-reference table that boils it all down from a drone pilot's perspective.
Airspace Classes at a Glance for Drone Pilots
Airspace Class | Chart Depiction | Altitude Depiction | Drone Authorization Required? |
|---|---|---|---|
Class B | Solid Blue Lines | Layered, up to 10,000 ft MSL | Yes, manual FAA approval required |
Class C | Solid Magenta Lines | Layered, typically up to 4,000 ft AGL | Yes, often available via LAANC |
Class D | Dashed Blue Lines | Single ceiling, e.g., for 2,500 ft MSL | Yes, often available via LAANC |
Class E | Dashed Magenta or Fading Blue/Magenta Lines | Starts at 700 or 1,200 ft AGL | Yes, if flying in E2 (surface level) |
Class G | No depiction (it's the empty space) | From the surface up to overlying controlled airspace | No, it's uncontrolled airspace |
This table is your cheat sheet. Knowing these depictions instantly tells you what your next steps are before you ever power on your drone.
Putting It All Into Practice with LAANC
For us drone pilots, spotting Class C or D airspace on a chart immediately triggers one thought: LAANC. The Low Altitude Authorization and Notification Capability system is our direct line to getting flight clearance. If your mission falls inside the boundaries of LAANC-enabled airspace, you can often get an automated "go-ahead" in seconds.
Let’s walk through a real-world scenario. You've been hired for a real estate shoot, and a quick check of the sectional chart shows the property sits squarely inside a dashed blue line.
Identify the Airspace: You instantly know you're in Class D airspace.
Check LAANC Grids: You fire up a LAANC-approved app (like Aloft or B4UFLY) and see the property is in a grid that allows automated authorizations up to 200 feet AGL.
Submit Your Request: You plug in the details for your flight, hit submit, and boom—within seconds, you have an official authorization to fly up to 200 feet.
It's that simple. But without looking at that chart first, you would have no idea that authorization was even necessary, putting you, your client, and other aircraft at risk. This is the perfect example of taking chart knowledge and applying it directly to your day-to-day operations.
Finally, what about the areas that aren't marked? That’s Class G (Gulf) airspace, which is uncontrolled. This is where a ton of recreational and commercial drone flying happens because you generally don't need authorization to fly there. For a much deeper dive into the nuances, check out our comprehensive guide to FAA airspace classification. Taking the time to learn these distinctions isn't just a good idea—it's what makes you a safe and responsible pilot.
Reading Terrain and Identifying Obstructions
A sectional chart is so much more than an airspace map—it's your topographical guide to the ground below. For any drone pilot, understanding the landscape is just as crucial as knowing the sky above. This is how you learn to see the operating area in three dimensions, letting you spot hazards before your props even start spinning.
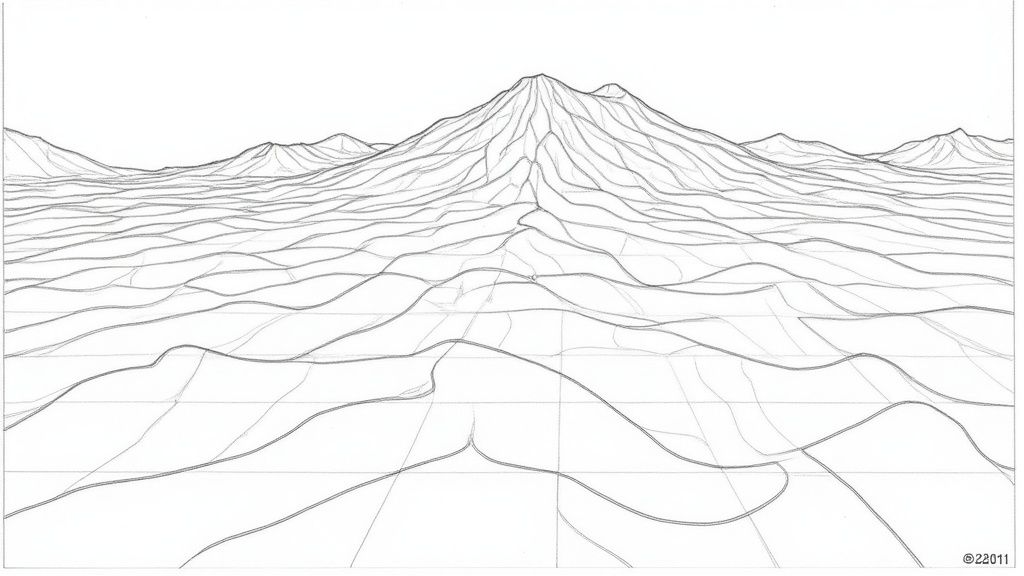
The ground's elevation is marked with contour lines, those thin brown lines that snake across the map. Think of them like the rings on a tree stump; the closer the lines are, the steeper the terrain. Widely spaced lines mean you're looking at a gentle slope or flat ground, while tightly packed lines scream "steep hill" or "bluff."
This is your first clue for planning a safe flight path, especially when you're flying low and slow.
Understanding the Maximum Elevation Figure
One of the most important numbers on a sectional chart is the Maximum Elevation Figure (MEF). You'll see it as a large, bold number sitting in the middle of each grid square, or "quadrangle," on the map.
The MEF shows the highest point within that specific grid, always rounded up to the next 100 feet. The kicker is that this figure includes both natural terrain and man-made obstructions. So, if you see an MEF of 2,400, it means the highest peak or tallest tower in that area is no more than 2,400 feet MSL.
This number is your go-to safety buffer. During pre-flight planning, the MEF gives you an instant, at-a-glance awareness of the biggest potential hazard in your vicinity, helping you set a safe maximum altitude for your entire mission.
Reading Obstruction Heights MSL and AGL
While the MEF gives you the big picture, you still need to pinpoint specific man-made obstacles. These are marked with distinct symbols on the chart, and next to each one are two numbers that tell you everything you need to know about its height.
Let's break down a common example: a tower marked with 1550 (510).
1550 MSL: The first number is the height in Mean Sea Level. This is the structure's absolute altitude from sea level.
(510) AGL: The number in parentheses is the height in Above Ground Level. This tells you exactly how tall the obstacle is from its base on the ground.
As a drone pilot, that AGL value is your primary concern. Since Part 107 rules generally keep you below 400 feet AGL, an obstacle marked (510) is an immediate red flag. Getting this right is a core part of your pre-flight planning and is absolutely fundamental to staying safe. We cover more of these must-knows in our guide to essential drone safety tips.
U.S. sectional charts are incredibly detailed. Some of the more complex ones, like the Los Angeles sectional, incorporate almost 70 different data layers. These charts are also republished twice a year, ensuring all the information on terrain, airspace, and obstructions stays current for all pilots. You can learn more about the art of aviation charts on Smithsonian Magazine.
Navigating Special Use Airspace and Other Hazards
Beyond the standard A-B-C-D-E-G airspace classes we’ve covered, sectional charts also map out areas where the usual rules of flight get a little… complicated. Flying your drone into one of these zones by accident can land you in some seriously hot water. That’s why checking for Special Use Airspace (SUA) is a non-negotiable part of any pre-flight plan.
These areas are clearly marked on your chart, usually with hatched borders and labels like "R-4808N" for a Restricted Area or "P-56" for a Prohibited Area. Each one has its own set of rules, and you absolutely have to respect them.
Understanding SUA and Military Routes
The most common types of SUA you’ll run into are Military Operations Areas (MOAs), Restricted Areas, and Prohibited Areas. They might sound alike, but for a drone pilot, they mean very different things.
Military Operations Areas (MOA): You'll spot these by their magenta hatched border. Can you legally fly VFR in an MOA? Technically, yes. Should you? Probably not without extreme caution. These are playgrounds for military training, which can involve fast-moving, low-altitude aircraft that won't be looking for your drone.
Restricted Areas: These are outlined with a blue hatched border. As the name says, flight is restricted. You can’t just fly in here. These areas often contain genuinely hazardous activities like live-fire exercises or missile testing. Permission from the controlling agency is mandatory.
Prohibited Areas: Also marked with a blue hatched border, these are absolute no-fly zones. Period. They protect sensitive national security locations like the White House. Entry is completely forbidden.
The big takeaway here is to treat any SUA with a ton of respect. Your chart legend or the side panel will give you the crucial details—active altitudes, times of day, and who to contact if you need more information.
On top of these zones, keep a sharp eye out for Military Training Routes (MTRs). Think of these as highways in the sky for military aircraft practicing high-speed, low-level flight. On a chart, they look like thin grey lines labeled with "IR" or "VR" and a number.
Pay close attention to that number. If a route has four digits (like VR-1255), it means flights on that route operate below 1,500 feet AGL. That puts them right in your backyard.
Staying Updated with TFRs and NOTAMs
Sectional charts are great, but they're a static snapshot. Some of the most immediate hazards are dynamic and temporary. I'm talking about Temporary Flight Restrictions (TFRs), which can pop up with little notice for things like VIP movements (think presidential visits), major sporting events, or natural disasters.
Because TFRs aren't printed on your paper chart, you have to check for them before every single flight.
This is where knowing how to read NOTAMs (Notices to Air Missions) becomes a critical skill. NOTAMs are the FAA's way of sending out real-time alerts on hazards like TFRs. For a deeper dive, you might be interested in our article on how to read a NOTAM for drone pilots.
The need for clear, standardized charts like the ones we use today really became obvious during World War II. By 1943, chart production exploded from 500,000 to over 11 million per year, proving just how vital these maps are for aviation safety. Discover more insights about the history of cartography on esri.com. Your ability to read these charts makes you part of that long legacy of keeping the skies safe.
Common Questions About Sectional Charts
Even once you get comfortable with the basics of reading a sectional chart, certain questions always seem to come up. It's totally normal. Let's run through some of the most common points of confusion to really nail down your understanding and make your flight planning smoother.
Think of this as your go-to reference for those "wait, what does that symbol mean again?" moments.
How Often Are Sectional Charts Updated?
This is easily one of the most critical questions you can ask, and it’s all about safety. The FAA officially updates and reissues sectional charts every 56 days. Why so often? Because things in the air and on the ground change—airspace boundaries shift, new towers pop up, and communication frequencies are updated.
Flying with an outdated chart is a huge risk. The easiest way to stay current is to go digital. Free resources like the FAA's own website or popular tools like SkyVector give you access to the latest charts, ensuring you have accurate information for every single flight.
What Is the Difference Between MSL and AGL?
You’ll see these two acronyms everywhere on a chart, usually next to towers and other obstacles. Getting them straight is non-negotiable for drone pilots.
MSL (Mean Sea Level) is altitude measured from the average height of the ocean. This is the standard for manned aircraft.
AGL (Above Ground Level) is just what it sounds like: the height of something measured from the ground directly beneath it.
As a drone pilot, your world revolves around AGL. Your legal flight ceiling is 400 feet AGL, so when you see an obstacle's height, the number in parentheses (the AGL value) is the one that demands your immediate attention. It tells you how high that tower actually is from the ground it sits on.
Can I Fly My Drone in a Military Operations Area?
Technically, the answer is yes. You can legally fly your drone in a Military Operations Area (MOA) under Visual Flight Rules (VFR). But the much better question is, should you?
MOAs are used for military training exercises. We're talking high-speed, low-altitude jets and other aircraft that are absolutely not looking for a small drone.
If you have no other choice but to fly in an MOA, you need to do your homework. Check the chart for the MOA's active hours and altitude ranges, and be on high alert the entire time. Honestly, the smartest move is to plan your flight for a time when the MOA is cold or just find a different spot to fly.
Many of these chart-reading skills are essential for your initial certification. For a deeper dive into the test material, check out our ultimate guide to https://www.jabdrone.com/post/mastering-the-faa-part-107-test-in-2024-your-ultimate-guide-to-success.
Comments