Building a Racing Drone: Your Complete FPV Build Guide
- Paul Simmons

- Jun 24, 2025
- 18 min read
What Actually Makes Racing Drones Different
When you picture a drone, you probably imagine a smooth, steady machine capturing gorgeous video. A racing drone is the polar opposite. Think of it less as a camera platform and more as a purpose-built missile engineered for raw speed, insane agility, and, most importantly, surviving spectacular crashes. This isn't about getting the perfect shot; it's about pulling off 6G turns and flying again after smacking into a race gate at full tilt. Understanding this core difference in design philosophy is the first step in building your own racing drone.
This focus on hardcore performance and resilience is a huge part of why the FPV world is exploding. The global racing drone market hit an estimated USD 1,098.9 million in 2024. Experts see that number climbing at a rate of about 22.1% every year through 2032, all thanks to pilots like you who are eager to see what these machines can really do.
Built for Punishment, Not Pictures
Forget the sleek, molded plastic shells you see on camera drones. Racing drone frames are almost always cut from carbon fiber. This isn't a style choice; carbon fiber provides an incredible strength-to-weight ratio, which is critical for both speed and durability. A few key design choices separate a tough racer from a pile of broken parts after one bad crash:
Arm Thickness: Beefy arms, often 5-6mm thick, are your first line of defense against breaking on impact.
Motor Protection: A good frame design will shield the motors, which often take the brunt of a crash. Some frames have extended arm tips just to absorb these hits.
Component Stack: The flight controller and ESC are housed in a central "stack," sandwiched between the carbon fiber plates. Keeping this electronic core safe is everything.
Imagine a pilot flying a frame with thin, flimsy arms. Clipping a tree branch could easily snap an arm clean off. Contrast that with a well-designed frame with thick arms and a protective top plate—it could cartwheel through the same branch and likely only come away with a few broken props.
The FPV System: Your Window to the Race
The First-Person View (FPV) system is the soul of the racing experience. It’s more than just a camera; it's an integrated video link that beams a live feed from the drone straight to your goggles. The quality of this video link is non-negotiable. If your video is poor, you're essentially flying blind, which is a surefire way to lose a race or completely wreck your quad.
A solid FPV setup depends on a careful balance between the video transmitter (VTX), the antenna, and how you position them. For example, if you mount your VTX antenna directly behind a big LiPo battery, your signal can get blocked every time you fly away from yourself. A simple fix, like using a longer antenna mount to get a clear line of sight, can be the difference between a crystal-clear image and a screen full of static. This kind of attention to detail is what separates a frustrating build from a reliable, race-winning machine.
Component Selection That Actually Makes Sense
Once you accept that a racing drone is basically a purpose-built crash machine, picking the right parts becomes a much more strategic exercise. It's easy to get lost in a sea of marketing hype and confusing specs. Let's cut through that noise and focus on what really affects your drone's performance on the track and its ability to survive a hard hit.
The Frame: Your Drone's Skeleton
Think of the frame as the skeleton of your racing drone. It’s not just about looking cool; its main job is to shield your expensive electronics while being as light and stiff as possible. Frame geometry has a massive impact on how the quad feels in the air. A "True X" frame, where the distance between motors is equal across both axes, often feels more balanced for freestyle flying. On the other hand, many racers lean towards "stretched X" frames, which can feel more locked-in and stable during high-speed, straight-line flight.
The material of choice is almost always carbon fiber, but not all carbon is created equal. The most important detail is arm thickness. For a standard 5-inch racer, arms that are 5-6mm thick offer a great balance of strength without piling on too much weight. Thinner arms might shave off a few grams, but they are far more likely to snap on the first serious impact. A broken arm mid-race means you're out—a few extra grams for durability is a trade-off worth making every single time.
Motors and ESCs: The Power System Heartbeat
Motor selection is where many new builders get tangled up by KV ratings. KV simply stands for RPM per volt. A higher KV motor (like 2700KV) spins faster than a lower KV motor (like 1900KV) on the same battery voltage, but it will also pull a lot more current. Higher KV isn't automatically better; it's about matching the motor to your flying style. High KV is awesome for blistering speed on tight tracks but will chew through your battery in no time. Lower KV motors are more efficient, giving you longer flight times and smoother control.
Your Electronic Speed Controllers (ESCs) are the unsung heroes of the power system. They have to handle the huge current spikes your motors demand during punch-outs and aggressive moves. A 4-in-1 ESC, which combines all four into a single board, is the go-to for racing builds because it keeps wiring clean and compact. Always make sure its continuous and burst amp ratings are well above what your motors can draw. An undersized ESC will overheat and fail, often sending your drone tumbling from the sky.
This infographic shows three common build profiles, illustrating how motor and battery choices lead to different flight characteristics.
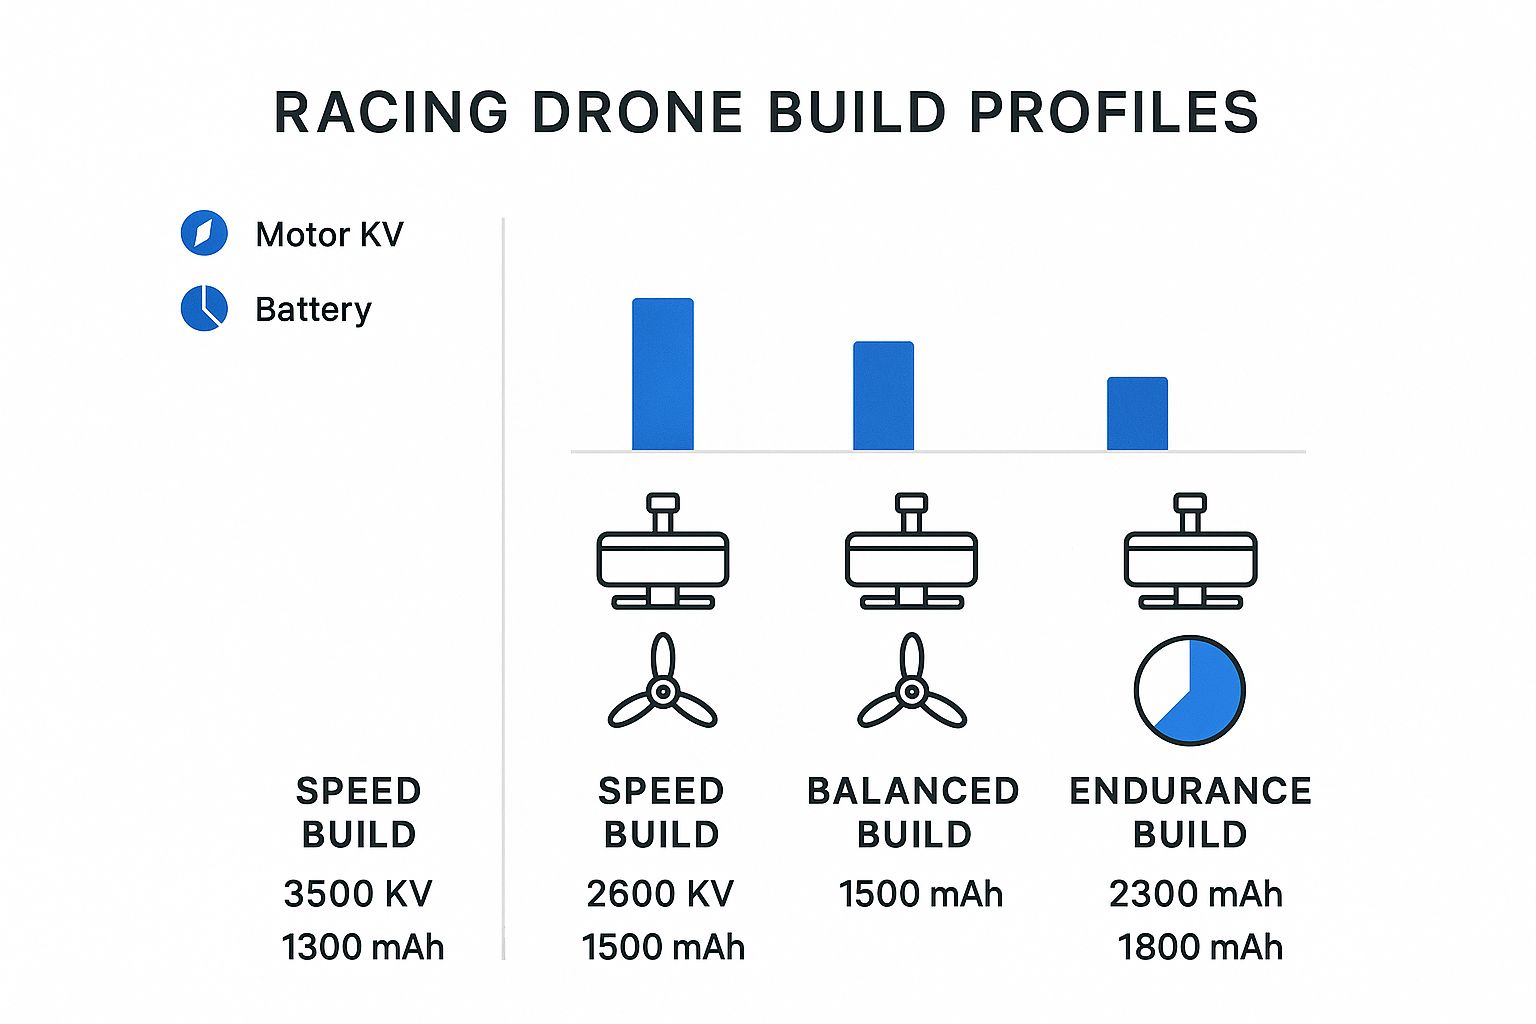
As you can see, there’s a direct trade-off between the explosive power of a speed-focused build and the extended flight time of an endurance setup.
To help you decide, here's a table comparing different component tiers. This will give you a clearer idea of where you can save money and where it's worth investing more for better performance and durability.
Racing Drone Component Comparison Guide
Comparison of essential racing drone components across different performance levels and budgets
Component | Budget Option | Mid-Range Choice | High-End Selection | Key Considerations |
|---|---|---|---|---|
Frame | Generic Carbon Fiber (4-5mm arms) | T-Motor, iFlight, GEPRC | Armattan, ImpulseRC | Arm thickness (5mm+ is ideal), carbon quality, and replacement part availability. |
Motors | EMAX ECO II Series | T-Motor Pacer, iFlight XING2 | T-Motor F40 Pro V, Ethix V5 | KV rating vs. battery voltage (e.g., 2400-2700KV for 4S, 1700-1950KV for 6S). |
4-in-1 ESC | SpeedyBee 45A | T-Motor Velox V2 55A | Foxeer Reaper F4 65A | Must exceed motor's max amp draw. BlHeli_32 firmware is preferred for features. |
Flight Controller | SpeedyBee F405 V3 | T-Motor F7, Holybro Kakute H7 | FETtec G4, KISS FC | Processor speed (F7/H7 is best for modern firmware), gyro quality, and layout. |
FPV Camera | Caddx Ratel 2 | Runcam Phoenix 2, Foxeer T-Rex | Caddx Ratel Pro, RunCam Racer 5 | Sensor size, low-light performance (WDR), and latency are critical for racing. |
VTX | Eachine TX805 | RushFPV Tank II, TBS Unify Pro32 | DJI O3 Air Unit, HDZero Race VTX | Output power (for signal penetration) and protocol (Analog, HDZero, DJI). |
This table shows that while budget parts can get you in the air, investing in mid-range or high-end components often buys you more durability and better performance, which can be the difference-maker in a race.
The Brain and Eyes of Your Build
Your Flight Controller (FC) is the central processor, running firmware like Betaflight to translate your stick commands into precise motor movements. For racing, an FC with a fast processor (like an F7 or H7) is a real advantage, as it can handle the complex calculations needed for smooth, locked-in flight.
Likewise, your FPV camera and Video Transmitter (VTX) are your eyes on the track. While many factors influence video quality, choosing a camera with good low-light performance and a reliable VTX is crucial for seeing clearly through gates and around obstacles. To get a better grasp of this, you can learn more by understanding drone sensors and camera capabilities.
The technology in this hobby is always moving forward. Drones are now starting to incorporate AI and computer vision to improve flight performance, which you can read about in this insightful market analysis. These systems can help with things like obstacle avoidance and real-time flight adjustments, potentially reducing pilot error during a competitive race.
Assembly Techniques That Prevent Disasters
With your components laid out, the real fun of building a racing drone can finally start. But before you jump in, let's go over a few small details that make a massive difference. Think of your workspace not just as a table, but as an operating room for your quad. Good lighting isn't a luxury; it's what prevents you from dropping a tiny M2 screw into the carpet, lost forever. A magnetic parts tray is a small investment that pays for itself the first time it stops a critical screw from rolling into oblivion.
This mindset extends to your tools. You don't need a professional workshop, but a few quality items will save you from a world of frustration. A good set of hex drivers is non-negotiable. Using cheap, soft-metal drivers is the fastest way to strip a motor screw, turning a simple task into an absolute headache. Likewise, a temperature-controlled soldering iron is crucial for creating strong, reliable connections without accidentally frying your flight controller.
Motor Mounting and Wire Management
Mounting your motors seems straightforward, but getting it right is key for both performance and durability. Always put a small dab of blue threadlocker on your motor screws. The intense vibrations from a racing drone can and will work screws loose over time, leading to wobbly motors and poor flight characteristics. When tightening the screws, use a cross pattern—much like changing a car tire—to make sure the motor sits perfectly flat on the arm. This simple step prevents uneven stress that could lead to a bent motor shaft in a crash.
From there, we turn to cable management, which is about so much more than just looks. A messy build is a fragile one. Wires pulled too tight will eventually break from the stress of high-G maneuvers, while loose wires can easily get sucked into spinning props, causing an instant and catastrophic failure. Your goal is to create clean, secure paths for every single wire.
ESC to FC: Use the harness that came with your components, but make sure it has enough slack so it doesn't pull on the connectors during a crash.
Motor Wires: Twist the three motor wires together. This not only looks much cleaner but can also help reduce electromagnetic interference. Secure them to the arm with a zip tie, leaving a small "service loop" near the motor for flexibility.
Component Wires: Route your receiver and camera wires away from the main power leads and ESCs to minimize any electrical noise. Heat shrink tubing is your best friend for protecting solder joints and keeping everything tidy.
The Art of Reliable Soldering
Soldering is a skill that truly separates a reliable quad from one that's always on the repair bench. For a racing drone, you're not just making an electrical connection; you're creating a mechanical bond strong enough to handle intense vibration and high current loads. A common mistake is the "cold" solder joint, where the solder doesn't properly flow onto both the pad and the wire. This creates a weak, high-resistance connection that can easily fail mid-flight.
A solid solder joint is shiny, not dull, and forms a smooth "volcano" shape around the wire and pad. Using flux is a game-changer here, as it cleans the metal surfaces and helps the solder flow evenly. Once your drone is fully assembled, every pilot should have a pre-flight routine. In fact, we have a great resource with a drone pre-flight checklist and essential safety tips that can help you catch problems before they become mid-air disasters. A few minutes of checks on the ground can save you hours of repairs.
Electronics Integration Without the Headaches
This is where the heart of your drone comes to life. The electronic stack, consisting of the flight controller (FC) and Electronic Speed Controller (ESC), is the brain and nervous system of your quad. It’s what connects all your components and tells them how to perform in the air. Getting this part right isn’t just about being good with a soldering iron; it’s about smart planning and understanding how these pieces communicate.
Choosing Your Flight Controller Wisely
Picking a flight controller can feel overwhelming with all the technical specs. For racing, though, you can narrow it down to what really matters. The processor is a huge factor. An FC with a modern F7 or H7 processor can run the latest firmware features and complex calculations without getting bogged down. This translates directly to a smoother, more locked-in feel, which is crucial when you're trying to hit a tight gate. While an older F4 processor will get you in the air, it might struggle with advanced filtering, leaving performance on the table.
Beyond processing power, check for firmware compatibility. Most pilots are on Betaflight, but some prefer alternatives like KISS or FETtec. Make sure your chosen FC has solid support for your firmware of choice to avoid frustrating dead ends later. Pay attention to the gyro, too. Some budget FCs use gyros like the MPU6500, which can be more prone to vibrations and tougher to tune than a more common option like the BMI270. This small detail can make a big difference in flight quality.
The Art of Clean and Reliable Wiring
Wiring is more than just connecting dots; it's a vital part of building a racing drone that affects weight, durability, and even how well your quad flies. While every gram is precious, skimping on wire gauge to save weight can be a fatal mistake. Your main battery leads connecting to the ESC need to be thick enough, usually 12AWG or 14AWG, to handle the massive current draw without melting or causing voltage sags that can crash your quad.
Here’s a practical way to wire your stack for the track:
Motor Wires: Always solder motor wires directly to the ESC pads. This connection is far more durable than plugs, which can easily pop out in a crash. Keep the wires just long enough to reach their pads, avoiding extra slack that adds unnecessary weight and mess.
Component Connections: Use a pin header and plug for things like your FPV camera and receiver. This makes it a breeze to replace a broken camera in the field without needing to fire up your soldering iron.
Wire Routing: Keep your signal wires (for the camera and receiver) away from high-current power lines. This simple step helps prevent electromagnetic noise that can cause lines in your video or, in worst-case scenarios, interfere with your control link. Use zip ties or heat shrink to lock everything down and keep wires away from spinning props.
A clean build isn't just about looking good; it's about being reliable. Tidy, secure wiring means that after a rough crash, your connections will likely hold, letting you get back to flying faster.
FPV System Integration for Crystal-Clear Video
Your FPV system is your view into the drone's world. A noisy or unreliable video feed is one of the most maddening problems a pilot can face, but it's often preventable with a bit of planning during the build. Clean power and smart component placement are your best defenses against video issues.
FPV Problem | Common Cause | Solution |
|---|---|---|
Lines in Video | Electrical noise from motors/ESCs | Power your VTX and camera from a filtered BEC (voltage regulator) on the FC. Solder a low-ESR capacitor directly to the ESC's battery pads. |
Video Signal Breakup | Antenna placement, "carbon blocking" | Mount your VTX antenna where the active element has a clear line of sight, away from the carbon frame and battery. An extended SMA pigtail helps. |
Sudden Video Loss | VTX overheating, power sag | Make sure your VTX gets plenty of airflow. Never leave it powered on the bench for long without a fan. Ensure your power source is solid, as a voltage drop can shut it down. |
Antenna selection plays a massive role. For racing, a tough, circularly polarized antenna like a Lollipop or Pagoda is an excellent choice, balancing signal quality with durability. A classic beginner mistake is poor antenna placement. Mounting your VTX antenna right behind the LiPo battery is like trying to yell through a wall—the signal gets smothered. Use a 3D-printed mount to get your antenna positioned vertically and clear of obstructions for the best transmission.
The popularity of drone racing has driven huge progress in these components. The global racing drone market was valued at about USD 493.59 million in 2024 and is expected to grow at an annual rate of 18.31% through 2034. This expansion means better and more dependable tech for all of us. You can read more about these trends in this detailed racing drones market report.
Finally, a strong power system goes beyond just wiring. Your LiPo batteries are the lifeblood of your quad, and proper handling is essential. Check out our essential LiPo battery safety guide to learn how to manage them safely and maximize your build's performance.
Flight Controller Setup That Actually Works
With your electronics neatly integrated, it's time to bring your drone's brain to life. The flight controller (FC) is what translates your stick movements into precise motor commands. However, the default settings it comes with are almost never tuned for the sharp, responsive feel you need for racing. This is the point where building a racing drone shifts from a hardware project to a software one, and it's where you'll unlock a huge amount of performance.
For most pilots, the first move is to flash the latest stable version of Betaflight, the open-source firmware that powers the vast majority of racing drones. Don't let the configurator intimidate you; we'll focus only on the changes that give you real, noticeable results in the air.
The Betaflight Configurator provides a visual way to tweak every aspect of your quad's flight behavior, from PID loops to rate profiles. Getting comfortable with just a few of these tabs is the key to turning a shaky first build into a locked-in racing machine.
Your First Configuration Steps
Once you've flashed the firmware, connect to the configurator and navigate to the "Setup" tab. The first thing you should do is calibrate your accelerometer so the drone understands what "level" is. Next, click over to the "Configuration" tab, which is where you'll set your core parameters.
Motor Direction: Check that your motors are spinning the correct way. The diagram in the configurator shows you the proper direction. You can reverse them right here or in your ESC software.
ESC/Motor Protocol: For almost any modern build, DSHOT600 is the way to go. It's a digital protocol that offers fantastic performance and doesn't need calibration.
Arming Angle: Set this to 180 degrees. This is a lifesaver because it lets you arm your quad no matter how it's oriented. If you crash upside down, you can use this to "turtle" back over without having to take the walk of shame.
Demystifying PIDs and Rates
PID tuning is the process of adjusting how your drone corrects itself, and it's what scares off many new builders. Don't worry about becoming a master right away. The default PIDs in modern Betaflight versions (4.x and newer) are surprisingly good for most 5-inch quads. Instead, put your energy into Rates and Expo, because this is how you personalize the drone's feel.
Rates determine the maximum rotational speed of your drone (in degrees per second), while Expo softens the stick inputs around the center for smoother, more precise small movements. A great starting point for a racing setup is around 700-900 deg/s on pitch and roll, with an Expo between 0.20 and 0.35. This setup gives you a quad that's gentle on small inputs but can snap into aggressive rolls and flips when you push the sticks to the edge.
Blackbox Logging for Better Tuning
If your FC has a Blackbox feature—either an SD card slot or onboard flash memory—make sure you enable it. Blackbox records all your flight data, creating a detailed log you can review later. This is incredibly helpful for troubleshooting problems like vibrations or oscillations that you can't quite diagnose by feel alone. It effectively turns guesswork into data-driven tuning, helping you pinpoint mechanical issues and perfect your PIDs without countless trial-and-error flights.
Testing and Optimization That Prevents Crashes
That first moment you plug a battery into your fully assembled quad is a wild mix of excitement and terror. This is where careful, methodical testing makes the difference between a successful first flight and an immediate, heartbreaking crash. Before you even think about arming the drone, a few pre-flight checks are non-negotiable. These simple procedures help you catch problems on the bench, saving you from expensive repairs and the dreaded walk of shame to retrieve a broken quad.
The most critical first step is using a smoke stopper. This small, cheap device goes between your battery and the drone. It will instantly cut power if it detects a short circuit, preventing you from frying your brand-new flight controller or ESC. Once you're confident there are no shorts, you can move on to basic system checks.
Pre-Flight Bench Checks
With your props off, plug your quad into a computer and open the Betaflight Configurator. These bench tests are your final line of defense against disasters on the field.
Motor Direction and Order: Head over to the "Motors" tab. Carefully and slowly raise the master slider to spin the motors. Double-check that each motor spins in the correct direction as shown in the diagram and responds to its specific slider. A motor spinning backward will cause the quad to flip instantly when you try to take off.
Control Response: In the "Receiver" tab, move your transmitter sticks around. Watch the corresponding bars move in the configurator. Rolling right should make the roll bar go up, pitching forward should make the pitch bar go up, and so on. If any are reversed, fix this in your transmitter's settings, not in Betaflight.
Failsafe Test: This is absolutely crucial. With the props still off, arm your drone and give it a tiny bit of throttle. Now, turn your radio transmitter off. The motors should stop spinning within a second. If they keep going, your failsafe is not set up right, which is incredibly dangerous.
Troubleshooting: Listening to Your Quad
When problems pop up—and they will—a systematic approach is much better than randomly swapping parts. Your drone gives you clues through sound and feel. An odd rattling could mean a loose screw or a cracked arm. A high-pitched whine that changes with the throttle might point to noisy motor bearings or an ESC timing problem. Learning to interpret these signs helps you pinpoint issues quickly.
Vibrations are a common enemy. They can confuse the gyro, leading to bad flight performance and "jello" in your FPV feed. If your quad feels shaky, check for bent props, damaged motor bells, or a frame that isn't stiff enough. Blackbox logging is an excellent tool here, letting you see exactly which motor is causing vibrations and at what frequency.
For instance, a pilot I race with was battling mid-throttle oscillations. Instead of endlessly messing with PIDs, he checked his Blackbox log. It showed a sharp vibration spike at a specific frequency that matched his motor RPM. The problem wasn't the tune; it was a slightly bent motor shaft from a minor crash that was almost impossible to see. Swapping that one motor fixed the issue instantly.
To help you diagnose your own drone's behavior, I've put together a table that covers common performance issues and how to tackle them methodically.
Racing Drone Performance Metrics and Troubleshooting Guide
Key performance indicators and common issues with their solutions for racing drone optimization
Performance Metric | Target Range | Common Issues | Solutions | Testing Method |
|---|---|---|---|---|
Vibrations | Minimal/Low | Jello in video, oscillations, poor prop-wash handling | Balance props, check motor bells for damage, tighten all frame and motor screws, use Blackbox analysis to isolate the frequency. | Blackbox logs, visual inspection of parts, flight video analysis. |
Motor Temperature | Warm to the touch (under 140°F/60°C) | Hot motors after a short flight, smell of burning | Lower PID D-gain, check for binding motor screws (too long), ensure clean airflow, try a different motor/prop combo. | Touch test (carefully!), infrared thermometer. |
Current Draw | Within ESC/Battery C-rating limits | Severe voltage sag, very short flight times, puffed batteries | Use props with less pitch, check current sensor calibration, choose a higher C-rating battery. | On-Screen Display (OSD) current reading, flight log analysis. |
Control Latency | As low as possible | "Mushy" or delayed stick feel, poor connection | Use a fast radio link like ExpressLRS, increase rate profiles, use an F7/H7 Flight Controller. | Subjective feel during flight, checking protocol specifications. |
By using this table, you can move from guessing to diagnosing. A logical approach not only fixes problems faster but also teaches you more about how your drone works, making you a better pilot and builder in the long run.
From First Flight to Race-Ready Performance
Getting your drone in the air for the first time is a massive accomplishment, but your work isn't over. That initial hover is just a handshake; the real fun is turning your collection of parts into a responsive machine that flies exactly how you want it to. The journey from a wobbly test hover to slicing through a race gate is all about building trust—in your piloting skills and your equipment. If you try to rush this, you're just asking for broken props and a bruised ego.
Your first few flights should be in a wide-open space, far from trees, people, or anything else you'd rather not crash into. The goal here isn't speed, but simply getting to know your drone. Focus on the basics: smooth takeoffs, holding a stable hover, gentle forward flight, and simple turns. You're learning the quad's unique character and listening for anything that sounds off, like weird vibrations. This is where you build the muscle memory and confidence you'll need for more aggressive flying later.
Adapting to Your Environment
Where you fly has a huge impact on how you'll want your drone to perform. An indoor race in a tight gym, for instance, is all about precision and having a "locked-in" tune. Top speed doesn't matter nearly as much as pinpoint control. On the other hand, a big outdoor track with long straights and sweeping turns demands raw power and the ability to handle high-G forces without wobbling. Your setup will need to change accordingly; a higher camera angle is a common adjustment for outdoor tracks to help you see where you're going at speed.
To get better, you have to know where you're going wrong. One of the best ways to do this is to re-watch your FPV footage. When you're in the moment, your brain is working too hard to notice the small stuff. Later, you can see if you're consistently taking a turn too wide or overcorrecting after a punch-out. This honest feedback helps you figure out if the issue is with your flying or if your drone's tune needs a tweak. For some solid advice on improving your stick control, check out our guide on [7 drone flying tips you should know](https://www.jabdrone.com/post/7-drone-flying-tips-you-should-know).
Planning Smart Upgrades
As you improve, you'll eventually hit a wall and want more performance. The secret is to make smart upgrades that actually give you an edge, not just expensive parts that look cool. Before you pull out your credit card, ask yourself what's actually holding you back.
Is your video feed glitchy in the corners? An antenna upgrade or simply moving your VTX antenna to a better spot might solve the problem more effectively than new motors.
Do you feel a lack of punch when you hit the throttle? This could mean you need more aggressive props or a battery with a higher C-rating.
Does the drone wobble and feel unstable in its own prop wash? This is a classic sign that your PID tune needs work—a totally free upgrade that only costs you some time and patience.
The FPV racing community is your best resource. Find a local multirotor club, get active on forums, and go to a race, even if you just plan to watch. You can learn more in one afternoon talking to experienced pilots at the field than you can in weeks of building by yourself. Seeing how others build and tune their quads will give you great ideas for improving both your drone and your flying skills.
Ready to take your passion for drones to the next level? Explore JAB Drone for expert reviews, build guides, and the latest news to keep you ahead in the world of FPV.
Comments