Build Your Own Drone Kit A Hands-On Guide
- James Baptiste

- Aug 14, 2025
- 18 min read
Jumping into a build your own drone kit is so much more than a weekend project—it’s a deep dive that turns you from a drone pilot into a drone creator. There's a special kind of satisfaction that comes from watching something you built with your own hands lift off the ground. It creates a real, tangible connection to the tech you're flying.
This hands-on process pulls back the curtain on everything from aerodynamics to electronics, giving you practical skills you just can't get from buying a drone off the shelf.
Why Build A Drone Instead Of Buying One
Sure, grabbing a ready-to-fly drone from a brand like DJI is fast and easy, but what you see is what you get. Customization options are usually minimal, and when something breaks, it often means shipping the entire unit back to the manufacturer. That leaves you grounded for weeks.
Choosing to build your own drone completely flips that script. Suddenly, you're in the driver's seat.
This journey is about more than just the final product; it's about the process itself. Every single step, from soldering the electronic speed controllers (ESCs) to flashing the flight controller firmware, deepens your understanding of how these incredible machines actually work. You stop being just a pilot and become the mechanic, the engineer, and the tuner all at once.
Unlock Deeper Knowledge and Skills
When you build a drone from a kit, you're essentially getting a crash course in several engineering fields at the same time. You’ll walk away with real-world experience in:
Electronics: You'll learn how to lay down a clean solder bead, wire up components like the flight controller and motors, and properly manage power distribution.
Mechanics: You'll see firsthand how frame geometry, your choice of materials, and even simple weight distribution impact how the drone flies and how well it survives a crash.
Software Configuration: You get to dive into powerful firmware like Betaflight to calibrate sensors, set up different flight modes, and fine-tune your drone's performance until it flies exactly how you want it to.
This foundational knowledge is priceless. When a motor inevitably burns out or you shatter a prop, you won't be scrambling to find a repair shop. You’ll have the confidence and the skills to diagnose the problem and fix it yourself, saving you a ton of time and money. For those who get really hooked on the science of flight, you can even explore professional aerospace optimization tools to get a taste of how the pros squeeze out every last bit of performance.
The real reward is empowerment. You gain the ability to not only fly but to create, modify, and repair your own aircraft, tailoring it perfectly to your needs—whether that's for buttery-smooth cinematic FPV, hardcore racing, or long-range exploration.
Before you decide, let's break down the key differences between going the DIY route and buying a pre-built drone.
DIY Drone Kit vs Pre-Built Drone Comparison
Attribute | Build Your Own Drone Kit | Pre-Built (Ready-to-Fly) Drone |
|---|---|---|
Customization | Virtually limitless; pick your own parts | Very limited; locked into manufacturer's ecosystem |
Repairability | Easy to repair; replace individual components | Difficult; often requires sending to the manufacturer |
Learning Curve | Steep but incredibly rewarding; gain deep knowledge | Minimal; fly within minutes of unboxing |
Initial Cost | Can be cheaper, depending on component choices | Often more expensive for similar performance |
Satisfaction | Immense; you built it from the ground up! | High, but focused on the flying experience only |
Ultimately, both paths have their merits. A pre-built drone gets you in the air quickly, but a DIY kit gives you the keys to the kingdom.
The whole DIY drone community is what’s pushing this forward. The First-Person View (FPV) market, which is almost entirely driven by custom builds, was valued at USD 287.72 million in 2024 and is on track to explode to an incredible USD 2.55 billion by 2032. This massive growth just shows how much demand there is for personalized drones in everything from filmmaking and agriculture to industrial inspections. You can learn more about these FPV drone market trends.
In the end, building your own drone isn't just another project; it’s an investment in a powerful and incredibly fun skill set.
How to Choose the Right Drone Kit
Jumping into a drone build is an incredible experience, but your first decision is by far the most important: choosing the right kit. This choice sets the tone for the entire project. It shapes your budget, the time you'll spend building, and ultimately, how your drone will fly. A poorly matched kit is a recipe for frustration, while the perfect one makes the whole process rewarding.
The market is flooded with options, from barebones frames that give you full creative control to all-in-one packages that streamline the process. The first thing you need to do is figure out what you actually want to do with your drone. That answer changes everything.
Defining Your Mission
Before you start adding parts to your cart, take a step back and think about your drone's purpose. Are you looking to scream through race gates with a high-speed FPV quad? Or is your goal to capture buttery-smooth cinematic video? Maybe you just want to cruise over beautiful landscapes on a long-range flight.
Each of these missions demands a very different build your own drone kit. A racing drone, for example, needs to be light and tough, built around a durable carbon fiber frame with motors that can deliver instant acceleration. A cinematic rig, on the other hand, requires a larger, more stable frame to carry a gimbal and a beefy battery for longer flight times.
Key Takeaway: Don't fall into the trap of buying the most popular kit or the one with the biggest discount. Your goal—whether it's racing, freestyle, or photography—should be the single most important factor guiding your component choices.
Nailing this down helps you cut through the noise and focus on kits that will actually serve your needs. If you're still on the fence between building and buying, our practical guide on how to choose a drone can help you sort out your priorities.
All-In-One Kits vs Sourcing Parts
For newcomers, the easiest path is often an "All-in-One" (AIO) or "Almost-Ready-to-Fly" (ARF) kit. These bundles usually include the frame, motors, electronic speed controllers (ESCs), and a flight controller. The biggest advantage here is that the parts are designed to work together, which takes a ton of guesswork out of the equation.
Pros of AIO Kits: Guaranteed component compatibility, often more budget-friendly than buying individually, and it makes shopping a whole lot simpler.
Cons of AIO Kits: You get less freedom to customize, and if one part in the bundle is a weak link, it can bring down the performance of the whole drone.
The alternative is sourcing every part yourself. This approach gives you absolute control. You can pick the exact flight controller known for its rock-solid performance or find the perfect motors to achieve your ideal thrust-to-weight ratio. It's a lot more research-intensive, but the payoff is a drone that's perfectly tailored to you.
Evaluating Key Components
Whether you’re looking at a complete kit or individual components, there are three areas that will make or break your build. The quality here is what separates a great flying quad from a wobbly, unreliable one.
Component | What to Look For | Real-World Impact |
|---|---|---|
Frame | Material (carbon fiber is king), arm thickness (e.g., 5mm for durability), and layout ("True-X" for racing, "Deadcat" for cinematic). | A cheap, flimsy frame will introduce vibrations and make your drone fly poorly. Carbon fiber is the industry standard for good reason—it’s light and incredibly tough. |
Flight Controller (FC) | Processor (F4 vs. F7), number of UARTs for peripherals like GPS, and a quality gyro (like the MPU6000). | The FC is literally the drone's brain. A faster processor and a clean gyro signal result in a smoother-flying drone that's much easier to tune. |
Motors & ESCs | Motor size (e.g., 2207) and kV rating (RPM per volt). The ESC amperage must be higher than the motor's max current draw. | This is your "power train." It dictates your drone's speed, efficiency, and agility. A mismatch here leads to overheating and disappointing performance. |
These days, building your own drone has never been more accessible. Advanced packages are now bridging the gap between simple AIO kits and a fully custom build. For example, high-end options like a Raspberry Pi Drone Kit, often priced around $899, can come with everything from a powerful single-board computer to a Pixhawk flight controller. These kits open the door to complex applications like autonomous navigation and computer vision missions.
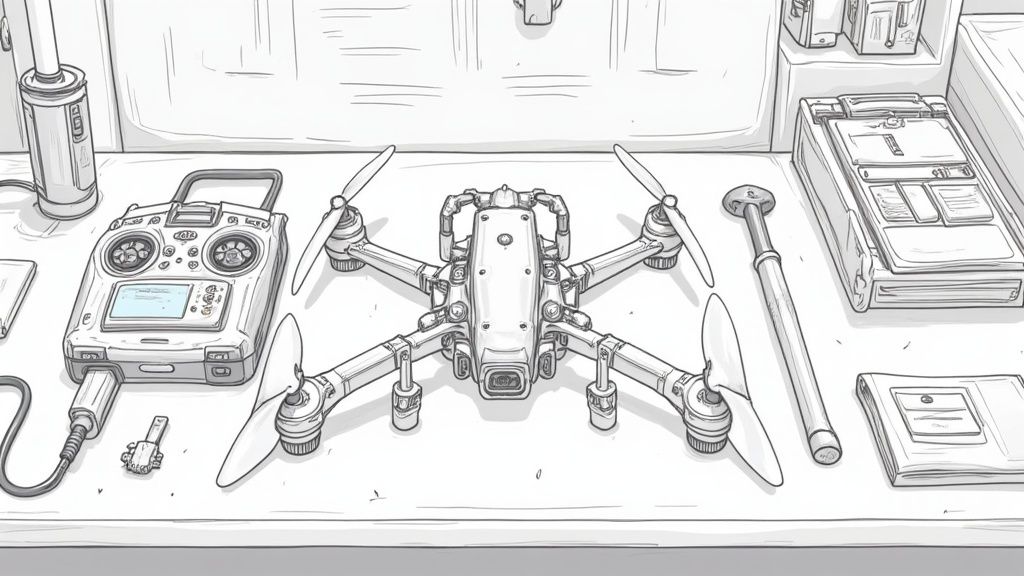
Assembling the Airframe and Mounting Components
This is the moment your pile of parts starts looking like an actual drone. The physical assembly is one of the most satisfying parts of any build your own drone kit project. It's also where a small mistake can create a massive headache down the road. My goal is to walk you through a clean, sturdy build, focusing on the little details that the instruction manuals often forget.
A solid airframe is your drone's skeleton. It has to be rigid enough to handle the incredible stress of high-speed flight but also put together in a way that dampens vibrations. A wobbly frame is a nightmare for your flight controller, sending confusing data that makes the drone almost impossible to tune for smooth flight.
Right now, we'll concentrate on getting the core structure right: the frame, motors, and the central electronics stack. Paying close attention here will give you a rock-solid foundation for the wiring and software setup that comes next.
Building the Core Frame Structure
First up, you need to assemble the frame itself. Most modern FPV kits use carbon fiber plates and arms, all held together with screws and aluminum standoffs. Before you do anything, lay out all your pieces and hardware to make sure nothing's missing.
I always suggest doing a "dry fit" before you start tightening everything down. Just loosely connect the plates and arms to see how they fit. It’s so much easier to spot a backward arm or a misplaced standoff before you’ve spent ten minutes cranking down screws.
Carbon Fiber Edges: Here's a pro tip: lightly sand the edges of your carbon fiber plates. Freshly cut carbon can be razor-sharp and easily slice into motor wires or battery straps under stress. A few gentle passes with some fine-grit sandpaper is all it takes to smooth them over.
Screw Length Matters: Pay very close attention to the screws you use to attach the arms to the main body. If a screw is too long, it can bottom out against the motor windings once you mount the motor, creating a dead short. Always double-check that your screws don't stick out past where they're supposed to.
For extra durability, especially for press-fit parts or repairs, a strong bonding agent like Gorilla Epoxy can be a lifesaver. You don't need it for every screw, but it adds some serious peace of mind for those critical connections.
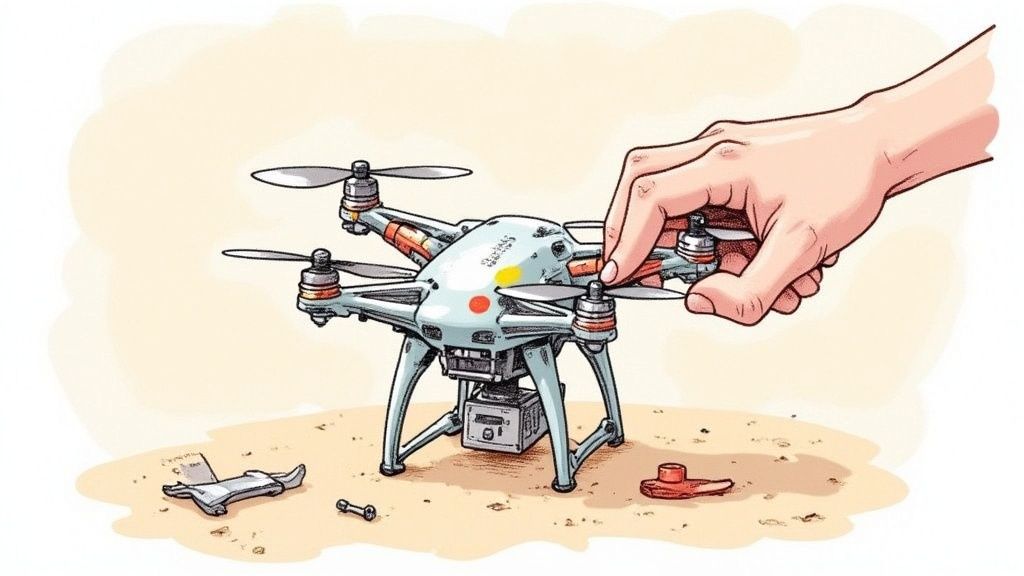
Securely Mounting the Motors
With the frame pieced together, it's time to get the motors on. This part seems straightforward, but getting it wrong can cause all sorts of nagging issues later. The absolute most important detail is getting the motor rotation direction correct.
Most quadcopters use a "props out" configuration. This means the front two motors spin outward (away from the camera) and the rear two motors spin outward (away from the center). Check your flight controller's documentation—it will have a diagram showing which motor number goes on which arm and its spin direction.
Mount the Motors: Place each motor on its designated arm and secure it from below with the included screws.
Use Thread-Locker: This is a non-negotiable step for me. The intense vibration from motors will loosen screws over time, guaranteed. Put a tiny dab of blue (medium strength) thread-locker on each motor screw before you tighten it.
The Cross-Tightening Pattern: Don't just crank down one screw and move to the next. Lightly tighten all screws in a cross pattern, like you're changing a car tire. This ensures the motor sits perfectly flush against the arm. Once they're all snug, go back and give them their final tightening.
A Lesson Learned the Hard Way: I once skipped thread-locker on a new build, convinced the screws were tight enough. During a test flight, a motor screw vibrated completely loose, and the motor ripped itself off the arm mid-air. The crash destroyed the frame and a brand-new LiPo. It's a two-minute step that can save you hundreds of dollars.
Installing the Brains and Power
Next, we'll install the flight controller (FC) and the 4-in-1 Electronic Speed Controller (ESC). These are typically stacked in the center of the frame, mounted on soft, vibration-dampening grommets. This "stack" is the heart and brain of your drone.
Vibration is the sworn enemy of a flight controller. The tiny gyroscopes inside are incredibly sensitive, and any excess vibration from the frame will make your drone fly erratically. This is why a proper installation is so important.
Install the Grommets: Carefully press the little rubber or silicone grommets into the mounting holes on your FC and ESC.
Build the Stack: Mount the ESC first, then place the FC on top. Connect them using the small wire harness that came with your components.
Avoid Pinching Wires: As you secure the stack, make sure no wires are getting pinched between the boards or between the stack and the carbon frame. This can cause shorts or break the wires over time.
This mechanical assembly is the crucial first half of the entire build. Taking your time here guarantees you have a reliable platform that’s ready for the detailed wiring and configuration to come. For a deeper dive into this part of the process, check out our ultimate guide to building your own FPV drone, which goes into even more detail.
Navigating the Wiring and Soldering Process
Alright, let's talk about the part of the build that often makes people nervous: wiring and soldering. This is where your collection of drone parts starts to look like a real machine. When you see that tangle of wires and heat up the soldering iron for the first time, it's easy to feel a bit intimidated. But honestly, this phase is all about being methodical and developing a steady hand—skills anyone can pick up.
A clean, solid wiring job isn't just for show. It's the backbone of your drone's reliability and makes any future repairs or upgrades a whole lot simpler. Trust me, a messy build with "cold" solder joints and pinched wires is just asking for a mid-air failure.
Mastering Soldering Fundamentals
Before you even think about touching a wire to a component, you need to get comfortable with your soldering iron. If you're completely new to this, do yourself a huge favor and grab a cheap electronics practice kit. Spending an hour just melting solder onto a practice board will build more confidence than watching a dozen tutorials.
Your success here really comes down to three things: a good temperature-controlled soldering iron, the right kind of solder, and flux. Don't skimp on the iron. Having one that can hold a steady temperature (somewhere around 350-400°C or 660-750°F) is a complete game-changer.
Pro Tip: The real secret to a perfect solder joint isn't just globbing melted solder onto the connection. The trick is to heat both metal parts—the wire and the pad—and let them melt the solder. This is what allows the solder to flow into the joint, creating a super strong electrical and mechanical bond.
The Art of Tinning Your Wires
Here’s a crucial step that beginners almost always skip: tinning. This is simply the process of applying a thin, even layer of solder to the stripped end of your wire and to the solder pad on your component before you even try to join them.
Why is this little step so important?
Faster, Cleaner Joints: With both surfaces pre-tinned, you just have to hold them together and give them a quick tap with the iron to create a perfect joint. This drastically reduces the amount of heat your sensitive components are exposed to.
Prevents Fraying: The solder holds all the tiny wire strands together, making them way easier to handle and poke through solder pads.
Stronger Connection: Tinning ensures the solder properly "wets" and bonds with the metal. This creates a far more reliable connection than just dropping a blob of solder on top.
Taking a minute to do this prep work transforms soldering from a frustrating mess into a clean, efficient, and almost therapeutic process.
The Logical Wiring Sequence
To avoid ending up with a "rat's nest" of wires, it’s always best to work from the outside in. Following a clear order keeps things tidy and prevents you from having to undo your hard work later.
Motors to the 4-in-1 ESC: This is your first major connection. Cut the three motor wires so they reach the Electronic Speed Controller (ESC) pads comfortably, without too much slack. Solder each of the three wires from every motor to their matching pads on the ESC.
ESC to the Flight Controller (FC): Most modern kits make this easy with a simple plug-in harness that connects the ESC to the flight controller. It’s quick and eliminates the risk of bad solder joints on these critical communication lines.
Radio Receiver to the FC: Your radio receiver typically needs three connections: power (5V), ground (GND), and a signal wire (TX/RX). Solder these to the correct UART pads on your flight controller—your FC’s manual will show you exactly where.
FPV Camera and VTX: Wire up your FPV camera and Video Transmitter (VTX) last. They usually need power (5V or 9V), ground, and a video signal wire. The camera's video-out wire goes to the video-in pad on the FC, and the FC's video-out pad connects to the video-in on your VTX.
This infographic gives you a good idea of the calibration and testing flow that comes right after you've nailed the wiring.
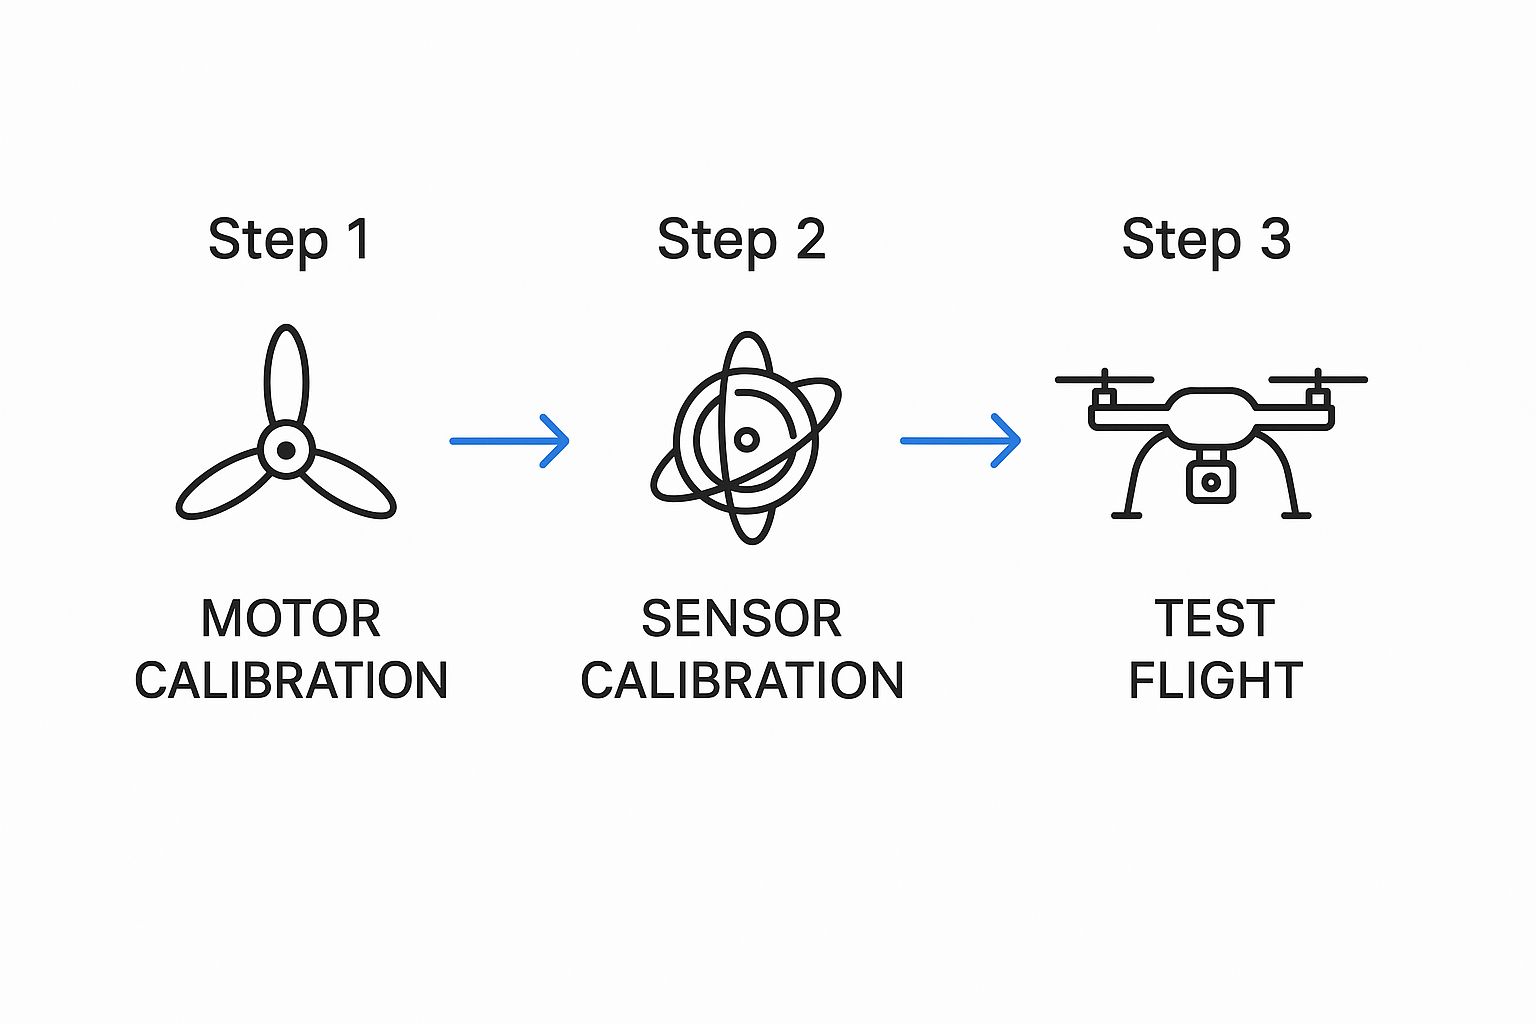
As you can see, once the physical build is done, you'll move into a series of software calibrations that are absolutely essential before you can safely get your drone in the air.
Keeping Your Electronics Safe
When you're handling sensitive electronics like a flight controller or ESC, you have to be mindful of electrostatic discharge (ESD). A tiny, invisible spark of static electricity from your body can instantly fry these components. It’s worth looking into proper ESD workspace and storage solutions for your build area.
This small investment is cheap insurance that protects your expensive components. The drone hardware market is booming and expected to hit around $6.7 billion in 2025, which means there are more amazing—and more sensitive—parts available to builders than ever before. Protecting them is key.
Cable Management Best Practices
Finally, remember this: a clean build is a reliable build. Once everything is wired up and you've confirmed it all works, take a few minutes for cable management. Use small zip ties to secure loose wires to the frame so they can't get snagged or chewed up by the propellers.
Twisting your power and signal wires together is another old-school trick that can help reduce electrical noise, which often translates to cleaner video and more stable performance. A tidy build isn't just about looking good; it's the mark of a careful pilot who values reliability.
Configuring Your Firmware for a Safe First Flight
Honestly, this stage is arguably the most important part of finishing your build your own drone kit. We'll be using a configurator—the software on your computer that talks to the drone's flight controller. Betaflight Configurator is the go-to for most FPV pilots and for good reason; it's incredibly powerful. The goal here is to dial in all the essential parameters to make sure your first flight is a success, and more importantly, safe.
First Connection and Flashing Firmware
First things first: connect the flight controller to your computer with a USB cable. But before you even think about plugging it in, I have a critical piece of advice learned the hard way: remove the propellers. Seriously. Never have your props on when working on the drone on your bench. It's a simple rule that can save you from a nasty injury.
Once you open the Betaflight Configurator, you should see an option to connect. If it connects right away, that’s great news—it means your computer sees the flight controller. Before you start messing with settings, though, it’s always best practice to flash the latest stable firmware. The firmware that comes pre-installed on budget flight controllers is often ancient, sometimes by several years.
Flashing the latest version unlocks huge performance improvements and new features, like the much-improved GPS Rescue modes. The process is pretty straightforward right inside the configurator. You’ll just need to select your flight controller’s target name (like OMNIBUSF4SD), pick the latest stable firmware version, and then load and flash it.
The Initial Setup Gauntlet
After a successful flash, your flight controller is essentially a blank slate. Now we can start the real work, methodically moving through the essential tabs in Betaflight. Don't rush this and don't skip any steps.
Your first stop is the Setup tab. Place your drone on a surface you know is perfectly level and hit the "Calibrate Accelerometer" button. This is crucial because it gives the flight controller its baseline "level" position, which is fundamental for stable flight. If you want a deeper dive, our quick expert guide on how to calibrate a drone covers why this is so important.
From there, you’ll work your way through several key tabs:
Ports Tab: This is where you tell the flight controller which UART (the physical port on the board) your radio receiver is soldered to.
Configuration Tab: Here, you'll set your ESC/Motor protocol (something like DSHOT600) and double-check that the motor spin direction is set correctly for your frame's layout.
Receiver Tab: Time to bind your radio transmitter. This tab is where you confirm that all your stick movements are mapped correctly. When you move the roll stick on your radio, the roll bar in the configurator better move with it!
Critical Safety Step: The Smoke StopperBefore you even think about plugging in a LiPo battery for the first time, use a "smoke stopper." It's a small, cheap device that goes between your battery and the drone to limit the current. If you have a dead short somewhere, this little lifesaver will keep you from instantly frying your expensive new electronics. Trust me, it's worth it.
Configuring Motors and Failsafe
With the basic setup done, it’s time to check the motors. Head to the Motors tab (props are still off, right?), enable the motor test, and very slowly raise the master slider. You're looking for two things:
Spin Direction: Is each motor spinning the right way according to the diagram?
Motor Order: When you raise the slider for motor 1, does motor 1 actually spin?
If a motor is spinning backward, you can usually reverse it in your ESC configurator (like BLHeliSuite) or sometimes directly in Betaflight.
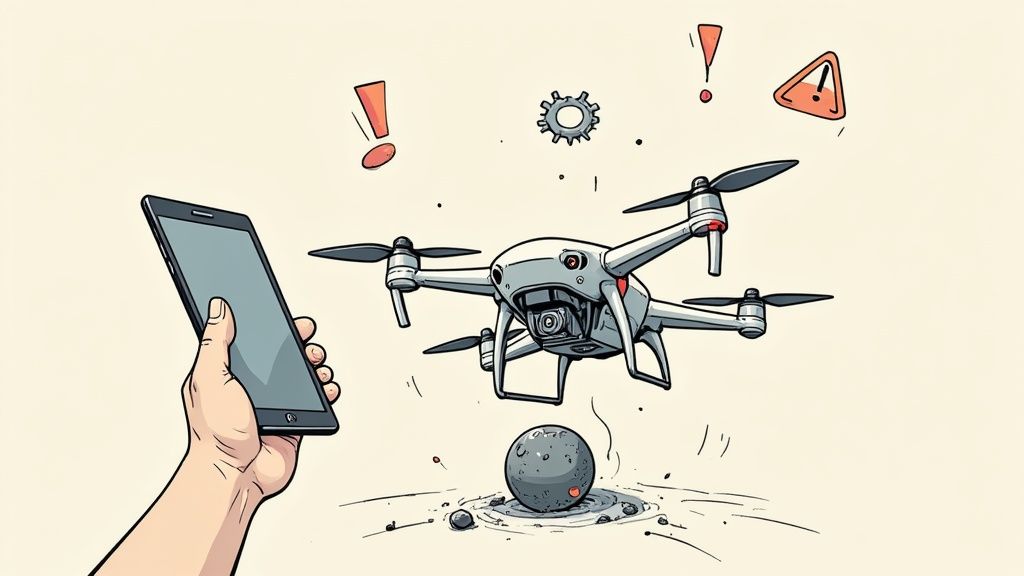
Next, and this is non-negotiable, is setting up your Failsafe. The failsafe tells your drone what to do if it loses the signal from your radio. A properly configured failsafe will command the drone to cut power to the motors and drop, preventing a dangerous "flyaway." Test it. Arm the drone (props off!), give it just a tiny bit of throttle, and then turn your transmitter off. The motors must stop instantly.
Setting Up Modes and the OSD
Finally, the fun part: setting up your flight modes and the On-Screen Display (OSD). In the Modes tab, you'll assign switches on your radio to do specific things. At an absolute minimum, you need to set one switch for Arming, which is the safety that lets the motors spin up. You'll also want to set up switches for flight modes like Angle mode (self-leveling, great for beginners) and Acro mode (full manual control).
The OSD tab lets you customize the info you see in your FPV goggles. I recommend keeping it simple at first with just the essentials:
Battery Voltage
Flight Time
Arming Status
RSSI (your radio signal strength)
This whole process might feel a little tedious, but it's the foundation of a reliable and safe quad. Taking your time here guarantees that when you finally put those props on and head out to the field, your build your own drone kit will perform exactly like it should.
Answering Your Top Drone Building Questions
Jumping into your first drone build is an incredible feeling, but it’s totally normal to have a ton of questions swirling around. Getting a handle on what to expect can be the difference between a frustrating afternoon of troubleshooting and an amazing first flight. Let's tackle some of the most common things new builders ask.
How Much Does It Really Cost?
This is the big one, and the honest answer is: it depends entirely on what you want to do.
You can actually get your feet wet with a very basic, non-FPV quadcopter kit for around $100 to $150. These are perfect for learning the fundamentals of how everything fits and works together without breaking the bank.
If you've got your sights set on a proper FPV drone for freestyle or racing, you'll want to budget between $250 and $500 just for the drone itself. That price point gets you into quality gear like a solid carbon fiber frame and a capable flight controller. Keep in mind, this doesn't include the essential FPV goggles and radio transmitter, which are a whole separate, significant investment. For high-end cinematic or long-range rigs, the cost can easily climb past $800.
Is Learning to Solder Really That Hard?
For a lot of newcomers, soldering looks like the most intimidating part of the build. I get it, but it’s a skill that is far more achievable than you might think. My number one tip? Go buy a cheap electronics practice kit. You can find them for under $10, and they let you build that crucial muscle memory without risking hundreds of dollars worth of drone components.
A few hours of practice combined with some good YouTube tutorials will build a massive amount of confidence. The real secret is using the right tools: a decent soldering iron with temperature control, quality 63/37 leaded solder, and a generous amount of flux. A clean, shiny solder joint is what stands between you and a reliable drone, so this is a skill well worth mastering.
What Are the Biggest Beginner Mistakes?
Over the years, I've helped enough first-timers to see the same few mistakes pop up again and again. Just knowing about these puts you way ahead of the curve.
Incorrect Motor/Propeller Direction: This is a classic. You have to double and triple-check that your motors are spinning the correct way and that your props are on to match. Get it wrong, and your drone will violently flip over the second you try to take off.
Skipping the Smoke Stopper: Powering up your build for the first time with a full LiPo battery is a high-stakes gamble. A "smoke stopper" is a cheap, simple device that limits the current and can save your flight controller or ESC from getting fried by an accidental short circuit. Don't skip it.
Forgetting to Set Failsafe: This isn't just a mistake; it's a major safety issue. You absolutely must configure your failsafe. This feature cuts power to the motors if you lose radio signal, preventing a dangerous "flyaway" where the drone just takes off uncontrollably.
If you find yourself with more questions as you get deeper into your project, our complete guide covers many more common questions about drone building in much greater detail.
What Software Will I Need?
Nearly all modern DIY drones run on incredible open-source firmware. For FPV, the undisputed king is Betaflight. It's unbelievably powerful, flexible, and backed by a huge, helpful community. If you're building a drone with a GPS for autonomous missions, then INAV is another fantastic choice.
To interface with your drone, you'll download the matching configurator software (like the Betaflight Configurator) to your computer. Think of this program as your mission control—it's where you'll flash firmware, calibrate all the sensors, and tweak every single aspect of how your drone flies.
Ready to start your own build? At JAB Drone, we provide the expert guides, reviews, and community support you need to build with confidence. Explore our resources and join the Sky Squad today at https://www.jabdrone.com.
Comments