A Drone Pilot's Guide to Li Polymer Battery Charging
- Jab Media
- Oct 5, 2025
- 18 min read
Updated: Oct 9, 2025
Getting a LiPo battery charged up properly is a two-step dance. First, the charger pushes in a constant current to get the voltage up quickly. Then, it switches to a constant voltage phase to gently top off the cells without overdoing it. If you want to get the most life and performance out of your batteries—and avoid any nasty surprises—you need to get this process right every single time with a good smart charger.
How to Read Your Drone's LiPo Battery

Before you even think about plugging anything in, you have to know how to read the label on your LiPo. Those numbers aren't just for show; they're the complete instruction manual for charging that specific battery. Getting them wrong is one of the fastest ways to destroy a perfectly good battery or, worse, start a fire.
It's simple, really. You wouldn't put diesel in a car that runs on gasoline, right? It's the same idea here. You have to match your charger's settings to what the battery tells you it needs.
Key Metrics on Every LiPo Battery
You'll find three critical pieces of information printed right on the battery's wrapper: its voltage (and cell count), capacity, and discharge rating.
Voltage and Cell Count (S Rating): The "S" number tells you how many cells are inside, wired up in series. Each LiPo cell has a nominal voltage of 3.7V and is considered fully charged at 4.2V. A 3S battery is just 3 cells x 3.7V for a nominal voltage of 11.1V. A beefy 6S battery is 6 cells x 3.7V, giving you 22.2V. This is the absolute first thing you’ll set on your charger.
Capacity (mAh): This is your battery's gas tank, measured in milliamp-hours. A 5000mAh battery can, in theory, deliver 5000 milliamps (or 5 amps) of current for a full hour. This number is what you'll use to calculate your charge rate.
Discharge Rating (C-Rating): This number tells you how fast you can safely drain the battery. For a 5000mAh battery with a 50C rating, it can theoretically handle a massive discharge of 250 amps (50 * 5 amps). While the C-rating is mostly about flight performance, a higher rating often means the battery is built with higher-quality materials that can handle more stress.
Nailing these fundamentals is the bedrock of good battery management. If you want to go deeper, we've got a whole guide on https://www.jabdrone.com/post/caring-for-lipo-batteries-expert-tips-to-keep-them-safe.
The Two Phases of LiPo Charging
A modern smart charger is incredibly sophisticated. It doesn't just blindly dump power into the pack; it follows a precise two-stage algorithm called CC/CV charging.
1. Constant Current (CC)The first phase is all about speed. The charger will send a steady, constant flow of current (say, 5 amps) into the battery. You'll see the battery's voltage climb steadily during this stage. This is where most of the charging happens, bringing the cells up toward their peak voltage pretty quickly.
2. Constant Voltage (CV)The moment any single cell in the pack hits that magic 4.2V mark, the charger immediately switches its strategy. It locks the voltage at 4.2V per cell and lets the current being drawn by the battery naturally taper off. The charge cycle is officially complete when that current drops to a tiny trickle, usually about 1/10th of the original charge rate.
This CC/CV method is absolutely critical. It charges the battery as fast as possible without ever pushing the cells beyond their 4.2V safety limit. Forcing a LiPo past that voltage is how you cause permanent damage and create a serious fire risk.
It's amazing to think how far this tech has come. The whole lithium-ion battery game really kicked off when Sony released the first commercial version back in 1991. The lithium-polymer variants we fly with today became popular around 2000, offering safer chemistry and more flexible shapes. By 2020, LiPo cells made up more than half of the entire global lithium battery market for portable electronics, which just goes to show how reliable they've become.
Choosing the Right LiPo Charging Equipment
Your charging setup is way more than a simple convenience—it’s the heart of your battery maintenance and, more importantly, your safety system. Nailing this from the get-go saves a ton of headaches, money, and ensures your charging routine is as safe and buttoned-up as possible.
Think of it this way: investing in good charging gear is like buying insurance for your expensive batteries and your workshop.
One of the most common points of failure I see in this hobby is a cheap, unreliable charger. It’s a fast track to imbalanced cells, undercharged packs, or even the nightmare scenario of an overcharge. The goal is to build a setup you can trust implicitly every single time you plug in a battery. This means looking beyond just the charger and thinking about the whole system, from the power supply feeding it to the cables connecting everything together.
Smart Chargers: The Brains of the Operation
The term "smart charger" gets tossed around a lot, but what are we really talking about? At its core, a smart charger is a device with a microprocessor that actively monitors and reacts to what the battery is doing in real-time. It’s not just pumping power in; it's a diagnostic tool.
When you're shopping for a charger, there are a few features that are completely non-negotiable.
Balance Charging Capability: This is the big one. A balance charger has a separate port for your battery's balance lead, which lets it see and adjust the voltage of each individual cell. This is critical for making sure all cells hit that perfect 4.2V at the same time, which is essential for battery health and safety.
Storage Mode Function: Any quality charger will have a dedicated "Storage" mode. This function is a lifesaver for your batteries. It automatically brings each cell to the ideal storage voltage (around 3.85V), which can dramatically extend the lifespan of a pack when you aren't flying.
Adjustable Charge Rate: You absolutely must be able to set the charging current (measured in amps) yourself. This control is what allows you to follow the standard 1C charging rule—the safest and most common rate for LiPos.
Honestly, these three features are the absolute foundation of proper battery care. Without them, you're just guessing, and that’s a risky game to play with LiPos.
Calculating Your Power Needs
One of the first questions pilots ask is, "How powerful of a charger do I need?" The answer is all about watts (W), and it's surprisingly simple to figure out. You just need a quick formula:
Watts = Max Cell Voltage x Amps
Let’s run through a real-world example. Say you want to charge a 6S 5000mAh battery at a standard 1C rate (which is 5 amps for this pack). The maximum voltage of a fully charged 6S LiPo is 25.2V (that's 6 cells x 4.2V per cell).
25.2V x 5A = 126 Watts
So, to charge just that one battery at a normal 1C rate, you'd need a charger rated for at least 126W. If you ever plan on parallel charging multiple packs at once, you’ll need to multiply that wattage accordingly. It's always better to have more watts than you need; an underpowered charger will just slow down the charge rate to compensate, leaving you waiting forever.
Pro Tip: Don't forget the power supply! A DC charger's wattage rating means nothing if its power supply unit (PSU) can't deliver the juice. Make sure your PSU's wattage is equal to or, even better, greater than your charger's maximum output.
Essential Charging Accessories
Your charger is the star, but the supporting cast is just as important. A few key accessories will make your setup safer and more convenient.
Accessory | Purpose | Why It's Important |
|---|---|---|
LiPo-Safe Bag | Fire Containment | A fire-resistant bag designed to contain the flames and pressure in the rare event of a battery failure during charging. |
Balance Board | Connection Hub | Allows you to connect multiple batteries of the same cell count to charge in parallel, saving significant time at the field. |
Quality Charge Leads | Secure Connection | Well-made cables with sturdy connectors (like XT60 or XT90) ensure a reliable, low-resistance connection between the charger and battery. |
Never, ever skimp on these items. A $20 LiPo bag could be the difference between a small incident and a garage fire. High-quality leads prevent connection dropouts that can screw up a charge cycle. These are small investments that pay massive dividends in safety and peace of mind. Remember, your charging setup is only as strong as its weakest link.
How to Configure Your Charger for a Perfect Charge
Got your gear sorted? Good. Now it’s time to actually use it. Firing up a smart charger for the first time can feel a bit like you’re in a cockpit, with all the screens and buttons. But trust me, once you run through the process a few times, it becomes muscle memory.
The whole point here is to get away from guesswork. Every LiPo battery has its charging instructions printed right on the label, and your charger is the precision tool you'll use to hit those marks perfectly every time.
Navigating Your Charger's Menu
Most smart chargers are pretty similar in how they’re laid out. You’ll power it on and land on a program selection screen. This is where you tell the charger what kind of battery chemistry you’re dealing with.
First things first, make absolutely sure you’ve selected the LiPo setting. Charging a LiPo on a NiMH or Li-Ion setting is a recipe for disaster. Those programs use totally different voltage cutoffs and can seriously damage your battery or worse.
Next, you'll pick the type of charge. You'll see options like "Fast Charge" or "Discharge," but the one you want 99% of the time is Balance Charge. This mode is the absolute cornerstone of LiPo safety and health because it makes sure every single cell inside the pack charges up evenly. No cell gets left behind or overcooked.
This infographic breaks down what the charger is doing during that balance cycle.
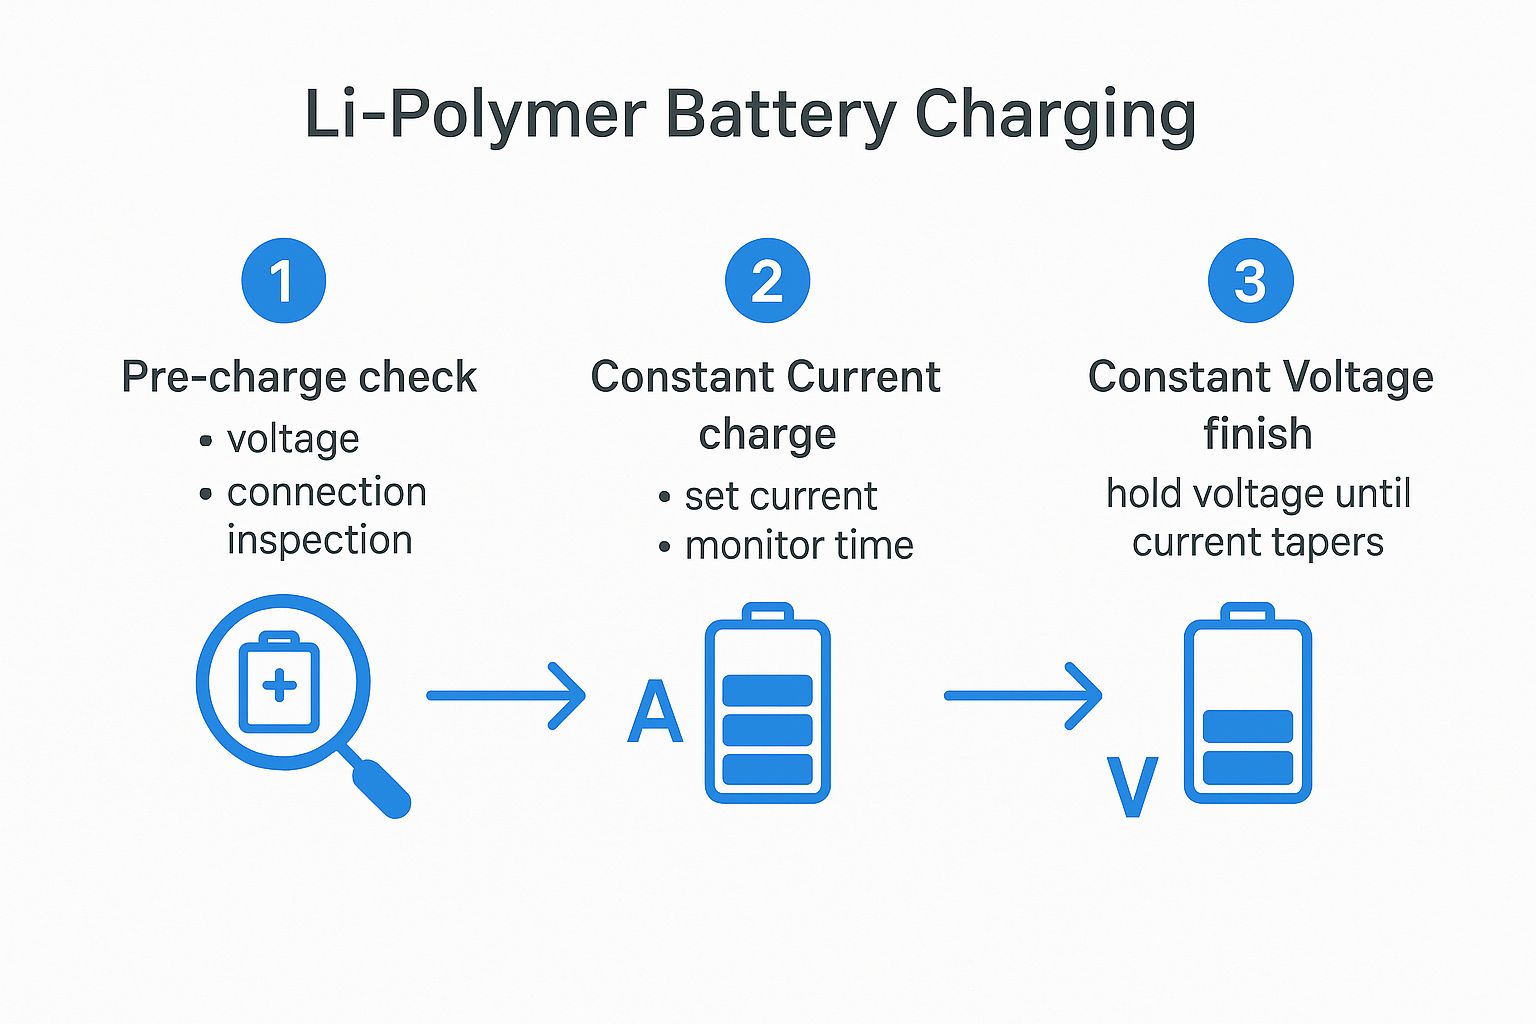
As you can see, it's a two-phase process. The charger pushes a constant current to get the battery most of the way there, then switches to a constant voltage phase to gently top off each cell without overcharging.
Dialing in the Correct Settings
Okay, you’ve selected "Balance Charge" for a LiPo battery. Now the charger will ask for two key pieces of information: the battery's voltage (or cell count) and the charge rate (in amps).
Setting the Voltage/Cell Count: The charger needs to know the pack's total voltage. For a 3S battery, you’ll select 11.1V (3S). For a beefy 6S pack, you’ll set it to 22.2V (6S). Many modern chargers are smart enough to auto-detect the cell count once you plug in the balance lead, but it’s always a good habit to glance at the screen and confirm it's correct before you hit start.
Setting the Charge Rate (Amps): This setting controls how fast the battery juices up. The safest, most universally accepted rate is called 1C.
The 1C charge rate is simply charging your battery at a current that's equal to its capacity. It's the gold standard because it puts the least amount of stress on the battery's internal chemistry, leading to a longer, healthier life for your packs.
Following this simple rule takes all the ambiguity out of the process.
Understanding the 1C Charge Rate
Calculating the 1C rate is super simple. All you do is take the battery's capacity in milliamp-hours (mAh) and divide it by 1000 to get the value in amps (A).
Let's use a real-world example. Say you have a 2200mAh 3S battery, which is a common size for smaller drones and FPV wings. The math is:
2200mAh / 1000 = 2.2A
You’d set your charger's current to 2.2 amps. Easy.
What about a bigger battery for a cinematography drone, like a 5000mAh 6S? Same deal:
5000mAh / 1000 = 5.0A
You would set the charger to 5.0 amps. Sticking to this 1C rule is the best way to ensure you're charging safely and within the manufacturer's guidelines. It's a key part of getting more air time from your gear. For more tips on this, check out our guide to boost your drone battery life tips for longer flights.
Now, you might see some newer, high-end LiPos rated for faster charging, like 2C or even 5C. A 2C charge on that 2200mAh battery would be 4.4A. But—and this is a big but—you should only charge faster than 1C if the battery label specifically says it’s okay. Pushing a standard battery too hard will make it overheat, which quickly degrades its performance and becomes a major fire hazard.
When in doubt, always stick to 1C.
Common LiPo Charging Parameters for Drones
To make things even easier, here’s a quick reference table. Use this to quickly find the right settings for some of the most common drone batteries out there.
Battery Capacity (mAh) | Cell Count (S) | Nominal Voltage | Max Charge Voltage (per cell) | Recommended 1C Charge Rate (Amps) |
|---|---|---|---|---|
1300 | 4S | 14.8V | 4.20V | 1.3A |
1500 | 4S | 14.8V | 4.20V | 1.5A |
2200 | 3S | 11.1V | 4.20V | 2.2A |
3000 | 4S | 14.8V | 4.20V | 3.0A |
5200 | 6S | 22.2V | 4.20V | 5.2A |
6000 | 6S | 22.2V | 4.20V | 6.0A |
This table covers a good range of batteries you'll encounter, from FPV racing quads to larger aerial photography platforms. Just find your battery's specs and you'll have the correct 1C charge rate ready to go.
Why Balance Charging Is a Non-Negotiable Step
Balance charging isn't just another option on your smart charger's menu—it's the single most important routine you can follow for the health, performance, and longevity of your LiPo packs. Honestly, skipping this step is like changing the oil in your car but never rotating the tires. It might seem fine at first, but sooner or later, that uneven wear is going to cause a serious problem.
For LiPo batteries, this "uneven wear" shows up as voltage drift between the individual cells tucked inside the pack. Even in a top-tier battery, tiny differences in internal resistance and capacity mean some cells work just a bit harder than others during a flight. Over time, these small imbalances really start to add up.
The Hidden Dangers of an Imbalanced Pack
When you do a standard charge without that balance lead connected, your charger is flying blind. It only sees the battery's total voltage. For a 3S pack, it just knows to aim for 12.6V (that’s 3 cells x 4.2V). The charger has no clue what each individual cell is doing.
This is where things get dicey. Imagine a 3S battery where the cells have started to drift apart:
Cell 1: 4.10V
Cell 2: 4.15V
Cell 3: 4.05V
A standard charger will just keep pumping current until the total voltage hits 12.6V. In this scenario, Cell 2 would get pushed far beyond its safe 4.20V limit to make up for the lower voltage in Cell 3. This overcharging is the number one cause of cell damage, puffing, and in a worst-case scenario, thermal runaway.
An imbalanced pack isn't just a safety risk on the charging bench; it cripples your drone's performance in the air. Your flight controller relies on an accurate total voltage reading to guess your remaining flight time. An imbalanced pack gives it a false sense of security, which can lead to a sudden, unexpected power loss mid-flight.
How Balance Charging Works Its Magic
This is where that small white connector, the balance lead, becomes your battery's best friend. When you plug it in, you're giving your smart charger a direct line of sight into each cell's individual voltage.
During a balance charge, the charger does something brilliant. It watches all the cells at the same time. If it sees one cell's voltage climbing faster than the others—like our Cell 2 from the example—it applies a tiny resistive load just to that cell. This bleeds off a minuscule amount of energy to slow it down, giving the other cells a chance to catch up.
This process continues with the charger making constant, tiny adjustments until every single cell hits the 4.20V peak at the exact same moment. It’s a precision process that guarantees no single cell ever gets overstressed or overcharged.
Checking Your Cells for Drift
Your smart charger doubles as a great diagnostic tool. Before and after every charge, get in the habit of scrolling to the screen that shows the individual cell voltages. Think of it as a health report for your pack.
Ideally, all the cells in a fully charged pack should be within 0.01V to 0.02V of each other (for example, 4.19V, 4.20V, 4.20V). If you see a drift greater than 0.05V between the highest and lowest cell, it’s a sign that the pack is aging or developing a weak cell. A consistent drift of 0.1V or more is a major red flag—that battery needs to be watched very closely or retired from service.
This kind of careful management is a key reason modern batteries last so long. Early lithium-ion batteries often supported only 300–500 full charge cycles. Today’s li-polymer cells, thanks to better materials and smart charging controllers, regularly achieve 800–1,200 cycles. This incredible durability has fueled the global smartphone market, which shipped over 1.4 billion units in 2022, nearly all using this chemistry and resulting in over 1.4 trillion charging events annually. You can discover more insights about the history of lithium batteries and their development.
Practical Safety Rules for Charging LiPo Batteries

LiPo batteries pack a serious punch, and all that power demands respect. While the technology is remarkably safe these days, a successful li polymer battery charging routine comes down to following a few practical, non-negotiable rules. These aren't just casual suggestions; they're the habits that separate a responsible pilot from a risky one.
The absolute golden rule of LiPo charging is dead simple: never, ever leave a charging battery unattended. I don't just mean being in the same house. You need to be in the same room, close enough to see and react if something starts to go sideways. The charging cycle is the most vulnerable time in a battery's life, and your presence is the best line of defense you have.
Creating a Safe Charging Zone
Your charging setup is just as important as the charger itself. Always charge on a surface that won't catch fire. A concrete basement floor, a couple of cinder blocks, or even a large ceramic tile are all great options. Never charge on a wooden workbench, carpet, or near flammable stuff like curtains or stacks of paper.
This designated area needs to be clear of clutter. In the unlikely event a battery vents, the last thing you want is for it to ignite a pile of boxes nearby. Setting up a sterile, fire-retardant zone is a simple step that drastically cuts down on potential damage.
Key Takeaway: The game here is all about containment and prevention. By picking a fire-resistant surface and keeping the area clear, you're not just hoping for the best—you're actively planning for the worst-case scenario, however unlikely it might be.
A critical piece of gear for this is a LiPo-safe charging bag or even a repurposed metal ammo can. These are built to contain the intense heat and flame of a battery failure, turning a potential disaster into a manageable incident. Charging inside one of these containers should be a non-negotiable part of your routine.
The Pre-Charge Health Check
Before you even think about plugging a battery in, give it a quick physical once-over. This takes all of five seconds and can stop a huge problem before it even starts. You’re looking for any red flags that tell you the battery is no longer safe to use or charge.
Keep an eye out for these warning signs:
Puffing or Swelling: If the battery feels soft, bloated, or "puffy," its internal cells are compromised. Do not charge it. Period.
Physical Damage: Look for dents, deep scratches, or crushed corners from a recent crash. Any breach of the battery's outer casing is a serious hazard.
Damaged Wires or Connectors: Frayed wires or a connector that doesn't fit snugly can cause a short circuit.
Damaged Wrapper: That plastic wrap isn't just for looks; it provides crucial insulation. If it's torn or peeling back, exposing the metallic cells, it’s time to retire that battery.
If you spot any of these issues, that battery's flying days are over. The only safe next step is to properly discharge it and dispose of it according to your local regulations. Our comprehensive guide on how to handle these situations offers essential tips.
Preparing for the Unthinkable
While incidents are rare, you have to have a plan for a battery fire. A LiPo fire is a chemical reaction that generates its own oxygen, which means a standard ABC fire extinguisher is mostly useless.
Your emergency kit should be simple and easy to grab:
A bucket of sand: This is the best and most accessible tool for smothering a LiPo fire.
A Class D fire extinguisher: If you have access to one, it's specifically designed for combustible metal fires.
Heavy-duty gloves: To safely handle a hot (but not burning) battery if needed.
It's important to keep the risk in perspective. Major manufacturers report incident rates of less than 1 in 10 million batteries, and most of those issues are traced back to user error or physical damage. Statistically, you are more likely to be struck by lightning than to have a modern, well-maintained battery spontaneously combust.
Beyond just proper charging, understanding the risks is key. For a deeper look into why Li-ion batteries can explode and how to ensure safety, that resource provides some excellent context.
Extending Battery Life with Proper Storage
What you do after a flight is just as important for your batteries as what you do before. Honestly, one of the fastest ways to kill a LiPo pack is to leave it sitting around fully charged or, just as bad, completely dead.
Give it just a day or two at those extreme charge levels, and the battery's internal chemistry starts to break down. You'll see it as reduced capacity and a much shorter lifespan. Proper storage isn't just a suggestion; it's the key to getting the most cycles out of each pack, which saves you money and ensures your drone has reliable power when you need it.
The Magic of Storage Voltage
The ideal state for a resting LiPo isn't full and it isn't empty. It’s a sweet spot right in the middle called storage voltage, which sits at roughly 3.85 volts per cell. At this specific voltage, the battery's chemical guts are at their most stable, dramatically slowing down the natural degradation that happens over time.
Think of a fully charged battery like a tightly wound spring—it’s packed with potential energy but also under constant internal stress. On the flip side, a totally depleted battery is like a spring that’s been stretched out so far it can't bounce back. Storage voltage is that relaxed, neutral state where there's almost no strain on the internal components.
Keeping a battery at 3.85V per cell when you're not using it can make a massive difference. A battery stored fully charged can lose up to 20% of its capacity in just a year. The same battery kept at storage voltage might only lose around 4%. This simple step is fundamental to proper li polymer battery charging and maintenance.
Using Your Charger’s Storage Mode
Thankfully, you don't have to guess to hit this perfect voltage. Just about every modern smart charger comes with a dedicated "Storage" mode built right in. Using it is about as easy as it gets.
After a flying session, don't just toss your partially used batteries in your bag. Take a minute to put each one back on the charger and run the storage cycle.
If the battery is above 3.85V per cell (say, you only flew for a minute), the charger will automatically drain it down to the target voltage.
If the battery is below 3.85V per cell (like after flying it down to landing voltage), the charger will bring it back up to that perfect storage level.
This feature takes all the guesswork out of the equation and gets your batteries perfectly prepped for a break, whether that's for a couple of days or a couple of months.
Ideal Long-Term Storage Conditions
Once your batteries are at the right voltage, where you keep them is the next piece of the puzzle. The best place for long-term LiPo storage is a cool, dry spot. Heat is the number one enemy of battery health because it speeds up the chemical reactions that cause them to degrade.
Try to find a spot that stays between 15°C to 35°C (59°F to 95°F). A basement, a temperature-controlled garage, or even a closet in an air-conditioned part of your house will do the trick. For a deeper dive into the best practices, check out our practical guide to the storage of LiPo batteries, which covers this topic in much more detail.
And don't forget—always store your batteries in a LiPo-safe bag or a metal ammo can, even when they aren't charging. It's a simple step that provides an extra layer of containment and a lot of peace of mind. Following these storage habits is the most effective way to protect your investment and make sure your packs are ready to rip, flight after flight.
Got LiPo Charging Questions? We've Got Answers
Even when you think you've got the hang of it, questions about li polymer battery charging always seem to come up. Let's tackle some of the most common ones I hear from drone pilots to keep your packs healthy and your flights safe.
How Long Will It Take to Charge My LiPo?
This is probably the number one question. A good rule of thumb is that charging at the standard 1C rate will take about 60 minutes. So, if you have a 5000mAh battery and you're charging it at 5.0 amps, expect it to go from storage voltage to fully charged in about an hour.
Sure, you can sometimes charge faster if the battery manufacturer says it's okay. But pushing a regular battery with a higher C-rate is a surefire way to shorten its life. Stick to 1C unless you know for a fact the battery can handle more.
Can I Just Leave My LiPos Charging Overnight?
Let me be crystal clear: absolutely not. This is one of the most critical safety rules in the hobby. Never, ever leave a LiPo battery charging unattended, especially not while you're asleep.
Yes, modern smart chargers have automatic cutoff features, but any piece of electronics can fail. Being there to monitor the process is your best and only real defense against a malfunction that could lead to a fire. As soon as that charger beeps, disconnect the battery.
What's a "C" Rating, Anyway?You'll see the "C" rating plastered all over LiPo batteries, and it primarily tells you the maximum safe discharge rate. But for charging, 1C is the universal gold standard for safety and getting the most cycles out of your pack. For a 2200mAh battery, a 1C charge rate is simply 2.2 amps. Easy as that.
Is It Really That Bad to Leave a LiPo Fully Charged?
Yes, it's incredibly harmful to the battery's health. When you leave a pack sitting at its peak voltage of 4.2V per cell for more than 24-48 hours, you're basically speeding up the degradation of its internal chemistry. This directly translates to lost capacity and a much shorter lifespan for your expensive battery.
Flight plans change, I get it. If you can't fly, just take a few minutes to hook the battery back up to your charger and run the "Storage" cycle. This will safely bring each cell down to a stable voltage of around 3.85V, keeping it healthy and ready for your next flight day.
At JAB Drone, our mission is to arm pilots with the expert knowledge they need to fly safely and get the absolute most from their gear. Dive into more in-depth guides and reviews at https://www.jabdrone.com.